

|
|
|
|
|
|
#466
 05-03-2014, 12:38 PM
|
||||
|
||||
|
Head back on
Unexpected time off for good behaviour (or something like that) - sun was shining too!
Cleaned the block surface with Eastwood's pre-paint stuff - really nice degreaser Sprayed the head gasket with hylomar gasket dressing to try and stop future corrosion and to improve sealing I'm re-using all but one of the head bolts. They're all in spec even the one I'm not using but that was corroded. Holes in the block have been cleaned as best as they can be - bought a new bolt from the dealer Part number for head bolt = 615 990 02 12 For my engine - M102.910 - this bolt is too long. It needs spacer 102 016 03 76 So look out for that! Check new bolt lengths with old ones.
__________________
1992 W201 190E 1.8 171,000 km - Daily driver 1981 W123 300D ~ 100,000 miles / 160,000 km - project car stripped to the bone 1965 Land Rover Series 2a Station Wagon CIS recovery therapy! 1961 Volvo PV544 Bare metal rat rod-ish thing I'm here to chat about cars and to help others - I'm not here "to always be right" like an internet warrior  Don't leave that there - I'll take it to bits! 
|
|
#467
05-03-2014, 12:48 PM
|
||||
|
||||
|
M102 camshaft binding
Bugger!
The FSM makes one heck of a song and a dance about camshaft binding. I need to read through it again - I don't want a repeat of what happened earlier on in this thread especially on me gucci Carlsson head. To start off I just laid the shaft in the head and got a feel for it spinning round (with the engine builders oil coated on it) I then fitted one of the rocker arm cradles Span it round - all was good PLEASE NOTE YOU MUST NOT OVER TIGHTEN THESE CRADLES WHEN THE ROCKER ARMS ARE NOT FITTED THERE IS A DIFFERENT TORQUE SPEC - RTFM! Removed the back cradle (over cylinder #4) and tried a different cradle over cylinder #3 All was good - removed that one over #3 and put in a new over #2 BINDING!!!!! <= bugger! Tried a different cradle => BINDING!!!!! <= bugger! Tried new cradle over cylinder #1 - all good Fitted cradles above #1, #3, and #4 cylinders - all good Time to break out the plasti-gauge and see what's what. I will also measure out of roundness with the shaft fitted with my DTI Checks will need to be made with the rocker arms fitted too - that could change stuff To be continued
__________________
1992 W201 190E 1.8 171,000 km - Daily driver 1981 W123 300D ~ 100,000 miles / 160,000 km - project car stripped to the bone 1965 Land Rover Series 2a Station Wagon CIS recovery therapy! 1961 Volvo PV544 Bare metal rat rod-ish thing I'm here to chat about cars and to help others - I'm not here "to always be right" like an internet warrior Don't leave that there - I'll take it to bits!
|
|
#468
05-03-2014, 03:20 PM
|
|||
|
|||
|
That engine sure looks nice.
|
|
#469
05-03-2014, 05:29 PM
|
||||
|
||||
|
Quote:
...I have only one type of the cradles supplied new. But => 35 camshaft bearing 1020510610 35 camshaft bearing front (standard size) 1020510410 35 camshaft bearing rear (standard size) 1020512210 35 camshaft bearing central (standard size) 1020511710 Hmmm I have to check what was fitted originally on the engine. I thought I only had two different cradles on the bit I broke. I reckon I'll be PMing a certain book worm to check out some stuff for me!
__________________
1992 W201 190E 1.8 171,000 km - Daily driver 1981 W123 300D ~ 100,000 miles / 160,000 km - project car stripped to the bone 1965 Land Rover Series 2a Station Wagon CIS recovery therapy! 1961 Volvo PV544 Bare metal rat rod-ish thing I'm here to chat about cars and to help others - I'm not here "to always be right" like an internet warrior Don't leave that there - I'll take it to bits!
|
|
#470
05-04-2014, 12:32 PM
|
||||
|
||||
|
Weird...
...I need to get some checks done.
Today I checked the old camshaft bearing supports. I only have two types R102 015 21 10 for positions over cylinders #2, #3, and #4 and R102 015 01 10 for the position above cylinder #1 Difference between the two types is the bearing support. The camshaft is supported at "position #1" by this "extra" bearing surface with this special camshaft / rocker bearing support assembly. The other bearing support positions of the camshaft #2, #3, #4 and #5 are only supported by the back end of the bearing support assembly. Position #2 is supported by the first bearing support (102 015 01 10) and it also does position #1... ...another strange thing though is that there is a difference between the other three bearing supports which all share the part number 102 015 21 10 => Two have no holes for the oil feeder pipe (that sprays oil on the camshaft) but one does. So I started over and fitted the correct saddle (= camshaft / rocker arm bearing support) over cylinder #1 and then fitted the correct saddle with the hole for the oil spray pipe over cylinder #4. I then checked the camshaft for any wobble / out of roundness by holding the magnet base firmly on a flat part of the alloy head => The needle barely move - I'm a happy man. I then fitted the other two cradles and found that the camshaft no longer binds! Great news - but it is still a concern because the clearance must be slim if more than one combination over cylinder #2 promotes binding. I'm still going to check the clearance for each camshaft bearing position (1-5) with plasti-gauge. None of the part numbers for the cradles I have on either my new or old head tally with the numbers for the 2.3 M102 engine found on the EPC diagrams on that dealer from Atlanta. I need to phone a friend to get this checked out properly. I also have different colour codes on the valve springs - and it looks like as usual I've put them in upside down - though I could not see any difference between either ends of these springs when I had them out... ...this also needs to get checked out before I button it all down. So today - some progress - some questions
__________________
1992 W201 190E 1.8 171,000 km - Daily driver 1981 W123 300D ~ 100,000 miles / 160,000 km - project car stripped to the bone 1965 Land Rover Series 2a Station Wagon CIS recovery therapy! 1961 Volvo PV544 Bare metal rat rod-ish thing I'm here to chat about cars and to help others - I'm not here "to always be right" like an internet warrior Don't leave that there - I'll take it to bits!
|
|
#471
05-05-2014, 12:31 PM
|
||||
|
||||
|
Quote:
102 051 01 10 (old nr.) = 102 051 04 10 - the normal front camshaft bearing. 102 051 21 10 (as I remember?) = 102 051 12 10 = 102 051 22 10 - the normal rear camshaft bearing with oil hole. 102 051 02 10 = 102 051 08 10 = 102 051 17 10 - the normal central camshaft bearings There are 3 types of the camshaft bearings - 1 front, 2 central & 1 rear. The front camshaft bearing have 2 bearings. The central camshaft bearings are identical. The rear one has oil hole. The each camshaft bearing have individual cast number corresponding to number of cylinder/position (1, 2, 3 & 4). 
Last edited by Dr. Sternschnuppe; 05-05-2014 at 01:18 PM.
|
|
#472
05-05-2014, 12:53 PM
|
||||
|
||||
|
Quote:
1) 102 053 02 20, yellow+red or violet+red 2) 102 053 11 20, violet+yellow-orange or yellow+yellow-orange 3) 103 053 00 20, violet-red-yellow 1-ver. used on engines up to 05/1988 2-ver. 3-ver. used from 05/1991 The 3rd ver. must be used as springs in case of repair (as replacement for 1st & 2nd versions).
|
|
#473
05-05-2014, 02:03 PM
|
||||
|
||||
|
Thanks for the information Dr Sternschnuppe - red white and blue springs are not on the list then I take it? I guess I'll have to go see the dealer about that - or measure my own spring rates...
...and those cradles I found on both new and old heads are strange with the same part number but only one with a hole...
__________________
1992 W201 190E 1.8 171,000 km - Daily driver 1981 W123 300D ~ 100,000 miles / 160,000 km - project car stripped to the bone 1965 Land Rover Series 2a Station Wagon CIS recovery therapy! 1961 Volvo PV544 Bare metal rat rod-ish thing I'm here to chat about cars and to help others - I'm not here "to always be right" like an internet warrior Don't leave that there - I'll take it to bits!
|
|
#474
05-05-2014, 02:36 PM
|
||||
|
||||
|
Quote:
Maybe just newer colors for coding (as in case with old & new p/ns)? Is there p/n on it? Quote:

Last edited by Dr. Sternschnuppe; 05-05-2014 at 02:47 PM.
|
|
#475
05-05-2014, 06:33 PM
|
||||
|
||||
|
I've sent an email to Carlsson to see if they will tell me about their product they sold over 20 years ago. I bet I don't get a reply!
__________________
1992 W201 190E 1.8 171,000 km - Daily driver 1981 W123 300D ~ 100,000 miles / 160,000 km - project car stripped to the bone 1965 Land Rover Series 2a Station Wagon CIS recovery therapy! 1961 Volvo PV544 Bare metal rat rod-ish thing I'm here to chat about cars and to help others - I'm not here "to always be right" like an internet warrior Don't leave that there - I'll take it to bits!
|
|
#476
05-10-2014, 09:42 AM
|
||||
|
||||
|
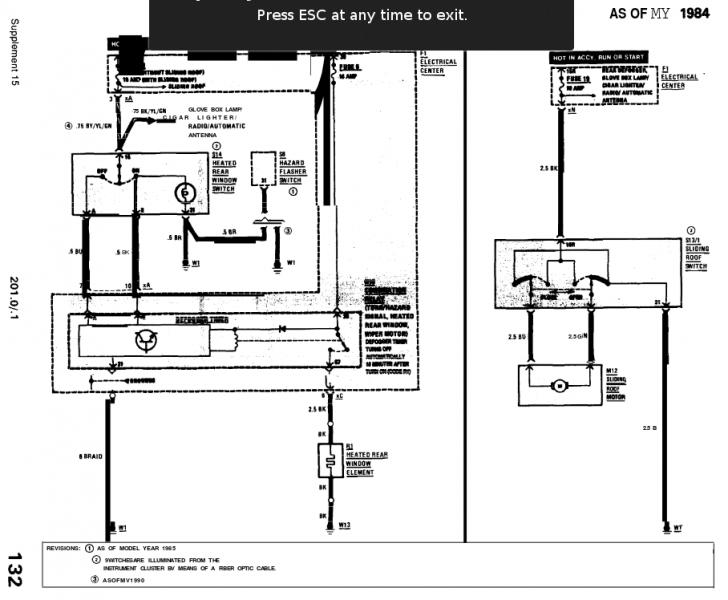
Can anyone help with this?
http://www.peachparts.com/shopforum/diesel-discussion/354660-w201-rear-window-heater-switch-wiring-plug-positions.html 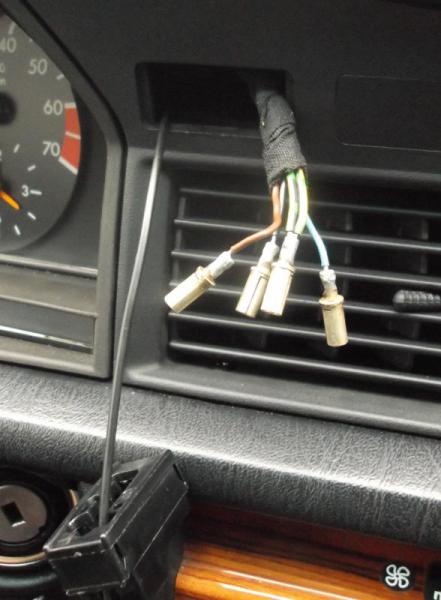 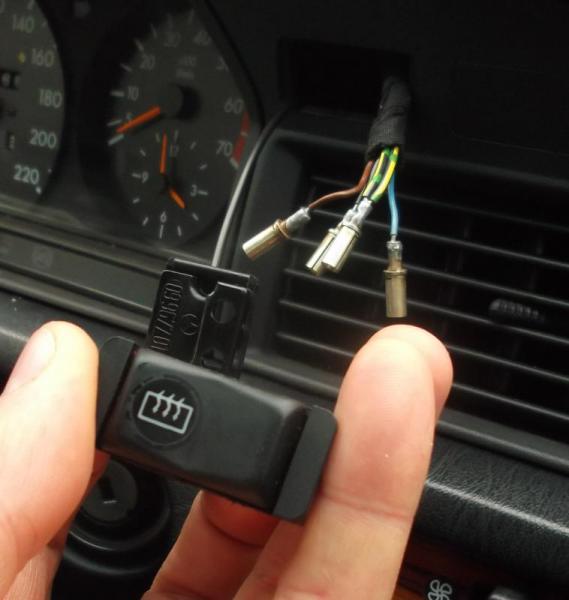 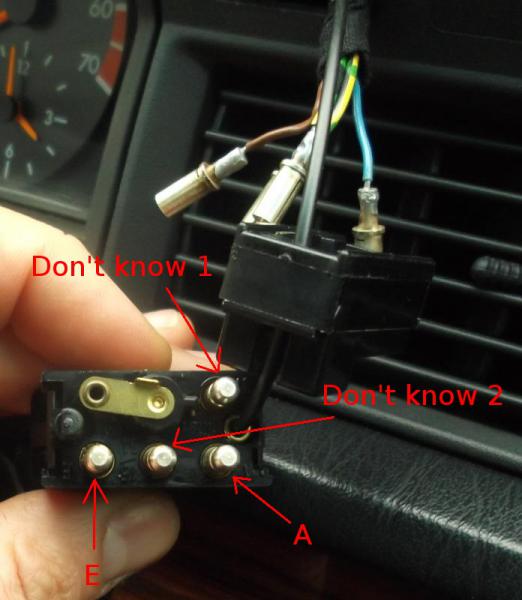
__________________
1992 W201 190E 1.8 171,000 km - Daily driver 1981 W123 300D ~ 100,000 miles / 160,000 km - project car stripped to the bone 1965 Land Rover Series 2a Station Wagon CIS recovery therapy! 1961 Volvo PV544 Bare metal rat rod-ish thing I'm here to chat about cars and to help others - I'm not here "to always be right" like an internet warrior Don't leave that there - I'll take it to bits!
|
|
#477
05-11-2014, 12:12 AM
|
|||
|
|||
|
Did you get this sorted out in your other thread? I can pop the switch out of one of my 201s if you still need it.
__________________
68 280SL - 70 280SL - 70 300SEL 3.5 - 72 350SL - 72 280SEL 4.5 - 72 220 - 72 220D - 73 450SL - 84 230GE - 87 200TD - 90 190E 2.0 - 03 G500 Nissan GTR - Nissan Skyline GTS25T - Toyota GTFour - Rover Mini - Toyota Land Cruiser HJ60 - Cadillac Eldorado - BMW E30 - BMW 135i
|
|
#478
05-11-2014, 02:42 AM
|
||||
|
||||
|
Quote:
Quote:
Quote:
Quote:
__________________
1992 W201 190E 1.8 171,000 km - Daily driver 1981 W123 300D ~ 100,000 miles / 160,000 km - project car stripped to the bone 1965 Land Rover Series 2a Station Wagon CIS recovery therapy! 1961 Volvo PV544 Bare metal rat rod-ish thing I'm here to chat about cars and to help others - I'm not here "to always be right" like an internet warrior Don't leave that there - I'll take it to bits!
|
|
#479
05-12-2014, 02:30 PM
|
||||
|
||||
|
Slow progress again
It is so wet. I think I'm going to have to buy a tent.
Welding in wind and rain is just not do-able. Small progress between the down pours - finally got a tie rod fitted! After greasing the rod end (I found limited grease in the joint) the ball just span round in the socket when I tried to tighten the nylock nut... ...I put off this job until I could find the large joint removal press You just need enough force to stop the ball from spinning. You don't need to really tighten - if you do you stand a chance of damaging the part you are trying to fit.
__________________
1992 W201 190E 1.8 171,000 km - Daily driver 1981 W123 300D ~ 100,000 miles / 160,000 km - project car stripped to the bone 1965 Land Rover Series 2a Station Wagon CIS recovery therapy! 1961 Volvo PV544 Bare metal rat rod-ish thing I'm here to chat about cars and to help others - I'm not here "to always be right" like an internet warrior Don't leave that there - I'll take it to bits!
|
|
#480
05-12-2014, 02:54 PM
|
|||
|
|||
|
there is a hex cast into the stud of the ball joint, you put a hex key in there (allen key) and tighten the nut with a spanner.
__________________
2012 BMW X5 (Beef + Granite suspension model) 1995 E300D - The original humming machine (consumed by Flood 2017) 2000 E320 - The evolution (consumed by flood 2017)
|
 |
| Bookmarks |
|
|


 Linear Mode


