

|
|
|
|
|
|
#1
 09-28-2016, 02:30 PM
|
|||
|
|||
|
Removing fuel tank. How?
Hi.
Is there a good write up on removing a 1971 W109 fuel tank? Is there a good online manual or video? Thanks 
|
|
#2
09-29-2016, 10:41 AM
|
||||
|
||||
|
DISCONNECT BATTERY , eliminate static electricity producers , use LED light instead of incandescent
after that  pretty straight forward and intuitive best to rid it of all fuel , remove pug/strainer . best if on ramps or lift, remove rubber attachments , the tanks are secured to trunk floor via bolts , don't forget about filler attachments, and once lowered will have to remove sender attachments
__________________
Ron 2015 Porsche Cayman - Elizabeth 2011 Porsche Cayman - Bond,James Bond Sadly MERCEDESLESS - ALways LOOKING ! 99 E320 THE Queen Mary - SOLD 62 220b - Dolly - Finally my Finny! Sadly SOLD 72 450SL, Pearl-SOLD  16 F350 6.7 Diesel -THOR 19 BMW X5 - Heaven on Wheels 14 38HP John Deere 3038E Tractor -Mean Green 84 300SD, Benjamin -SOLD 71 220 - W115-Libby ( my first love) -SOLD 73 280 - W114 "Organspende" Rest in Peace 81 380 SL - Rest in Peace
|
|
#3
09-29-2016, 11:08 AM
|
|||
|
|||
|
Thanks Panda.
I'll just have car ramps. How is the protection plate attached at the rear? Apart from filler is there anything else that needs to be disconnected or undone from inside the boot/trunk?
|
|
#4
09-29-2016, 02:09 PM
|
||||
|
||||
|
any chance you could post a picture of the scope of work. Iam not certain how the protection plate is held on but if I am remembering correctly there are frame attachments
This gentleman may be able to shed some light on your project , he has an email contact on this site W109 | JaimeKop.com
__________________
Ron 2015 Porsche Cayman - Elizabeth 2011 Porsche Cayman - Bond,James Bond Sadly MERCEDESLESS - ALways LOOKING ! 99 E320 THE Queen Mary - SOLD 62 220b - Dolly - Finally my Finny! Sadly SOLD 72 450SL, Pearl-SOLD 16 F350 6.7 Diesel -THOR 19 BMW X5 - Heaven on Wheels 14 38HP John Deere 3038E Tractor -Mean Green 84 300SD, Benjamin -SOLD 71 220 - W115-Libby ( my first love) -SOLD 73 280 - W114 "Organspende" Rest in Peace 81 380 SL - Rest in Peace
|
|
#5
09-29-2016, 02:26 PM
|
|||
|
|||
|
Don't consider this a step by step but more like a good guide of what to expect.
The first thing to do is to disconnect the battery. (Duh!) The next would be to empty the trunk, removed any carpet or rubber mat on the floor and pull up the round plastic cover to the sending unit connection. There is a slot on this cover, a small one, to fit a screwdriver in to pop it up. Then remove the plug for the fuel sending unit. While you are in the trunk look for any connections to the vapor recovery system that might be on the fuel filler neck. These need to come off and many times are just connected by some rubber hoses with small clamps. Sometimes you get to these from the top, sometimes the bottom. Just look for them. Remove the gas cap. If there is a rubber grommet around the fuel filler line then shoot some spray lube on it to ease the removal of the fuel filler line when you lower the tank. The fuel filler line will come out with the tank. Siphon the remaining fuel from the tank. This will take longer than you think. Under the car remove the fuel lines from the strainer and be ready to catch a lot of fuel. You might have thought you had pulled it all out with the siphon but you cannot get to the 'frying pan' where the fuel pickup/strainer is located. Look to the front of the tank. There may be some evaporative recovery lines connected there. If so disconnect them. I think there are two bolts that hold this to the frame on the back side of the tank, near the bumper. There is one bolt holding the tank to the frame on the front side of the tank. I doubt that this will just drop out. You will be hung up on the fuel filler pipe and will have to wiggle the tank out. This is why you applied the spray lube when you did. And remember.... This is just a general guide based on what I have seen and done. Look carefully at all sides of the tank before removing the bolts holding it in and try not to miss any connections. And you can't overlook what a pervious owner might have done to 'improve' on Mercedes designs. So move slowly. This is really a quick job, it is just one where you need a sharp eye for detail.
|
|
#6
09-29-2016, 04:01 PM
|
|||
|
|||
|
I've removed fuel tanks from W111, W108, W113 cars and it's always been easy and fairly obvious. The most difficult part is getting as much gas as possible out of the tank. The rest is common sense. Why are you removing it?
|
|
#7
09-29-2016, 06:14 PM
|
|||
|
|||
|
Thanks very much guys.
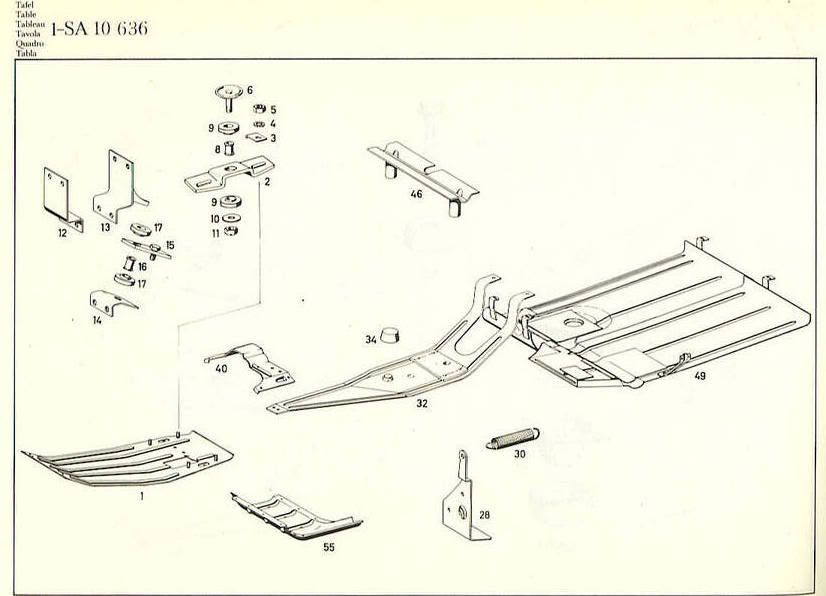
Feel abit more confident now. This is a project W109. In fact i totally under estimated the amount of rust. Nice garages have rebuilt many parts with pure filler and fibre glass. Especially around the rear chassis rails. I'm wanting to make it as right/strong as I can and didn't fancy all that welding and grinding right next to the fuel tank. Also give me a nice opportunity to clean/paint tank area and maybe have the protection plates powder coated. Whilst on the subject, me front protection plate is missing. Love to see some pics of what should be there. K.
|
|
#8
09-29-2016, 06:30 PM
|
|||
|
|||
|
...exactly what is a "protection plate"....?
|
|
#9
09-29-2016, 06:39 PM
|
|||
|
|||
|
Quote:
Since the sump hung down below the car it was possible to hit a pot hole with the front of the oil pan. This would normally shatter it and dump all your oil on to the road. So a metal skid plate was offered if you lived in a area where the roads were less than perfect. I don't have a photo of one, but the guys over at M-100.cc might.
|
|
#10
09-29-2016, 06:44 PM
|
|||
|
|||
|
I understand what you mean now. And was there something similar in the rear of the car?
|
|
#11
09-30-2016, 02:02 AM
|
|||
|
|||
|
Yes. This was originally an African car. So I guess has all protection options fitted! Lol
|
 |
| Bookmarks |
|
|


 Linear Mode


