

|
|
|
|
|
|
#16
 08-11-2016, 03:37 AM
|
||||
|
||||
|
You can do it! My $0.02 in red
Quote:
__________________
$60 OM617 Blank Exhaust Flanges $110 OM606 Blank Exhaust Flanges No merc at the moment 
|
|
#17
08-11-2016, 12:15 PM
|
|||
|
|||
|
Quote:
-I bought a heat shield from an 85 Cali 300D I'm going to use. I'm gonna make it fit not matter what. A one year, California only item that took me long enough to find it. -I just splurged on two ø12" Mishimoto slimline fans because the gap between the radiator and engine is almost nothing. I really didn't want to have to use pusher fans. -Right now I only have the downpipe for the exhaust. I'll probably drive it around the block with just that, but a trip to Chad's is something else. -The tires are from my daily driver, the alignment was off and cut a bevel in several of the tires. I'm not driving it further than around the block on those things. (plus the dry rot)
__________________
Onus probandi incumbit ei qui dicit, non ei qui negat I recondition w123/w126/w124/w140/r107/r129/ steering boxes! 1984 300D "Elsa" odo reset 6/2011 147k 1983 300TD "Mitzi" ~268k OM603 powered 1995 E300 "Adelheid" 262k [Sold]
|
|
#18
08-12-2016, 07:48 AM
|
|||
|
|||
|
I promised pictures. Some were taken at night.
One issue I ran into was the power steering low pressure line exiting the steering box would contact the w124 motor mount. I tried to heat and bend the short hard line elbow, but it just wanted to collapse. So I removed the fitting from the steering box.  The line cup fitting is on the right, the threads on the left go into the box. They are M16 x 1.5mm. The internal diameter is 10mm which is a Light Fitting. I installed a M16 x 1.5mm male right angle to 3/8" JIC female. Then used a 3/8" male to hose barb fitting. (Just in case you were wondering, yes, that silver thing is my steering box. I had a customer ask if I could paint one with POR15, so I tried it on my own first. The answer is no, the steering box is always going to be a little oily and the finish with be uneven)  I was trying to figure out if I could remove the oil pressure sender fitting and tap it so I could use the mechanical oil pressure line for the w123 cluster. But when I removed the oil pressure sending unit I found it was the exact same thread as the original w123 oil pressure line. M12 x 1.5mm  
__________________
Onus probandi incumbit ei qui dicit, non ei qui negat I recondition w123/w126/w124/w140/r107/r129/ steering boxes! 1984 300D "Elsa" odo reset 6/2011 147k 1983 300TD "Mitzi" ~268k OM603 powered 1995 E300 "Adelheid" 262k [Sold]
|
|
#19
08-12-2016, 07:54 AM
|
|||
|
|||
|
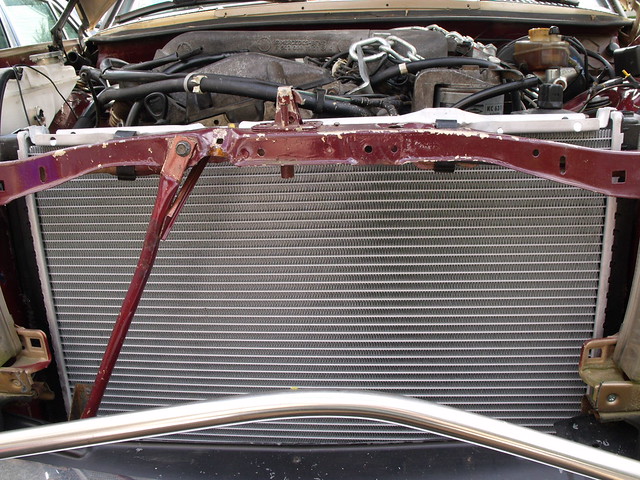
I'd thought of using a 300SDL radiator since the 603 usually has a inner fender mounted oil cooler. The oil cooler is going to be mounted in the w123 driver's inner fender (to be installed next week) leaving a gap on one side of the original 617 radiator. I wanted something that would fit the entire space and would give a bit more cooling. After measuring a few radiators I bought a new Nissens radiator for a w124 300D. There were tabs that run the length of the sides of the radiator that I hacked off as they were contacting various brackets on either side of the core support.
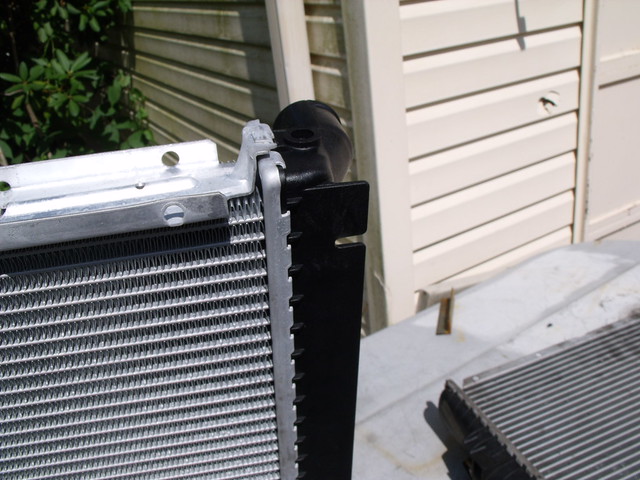  The radiator does fit quite nicely and I'm hoping to use the standard hoses for the 603. 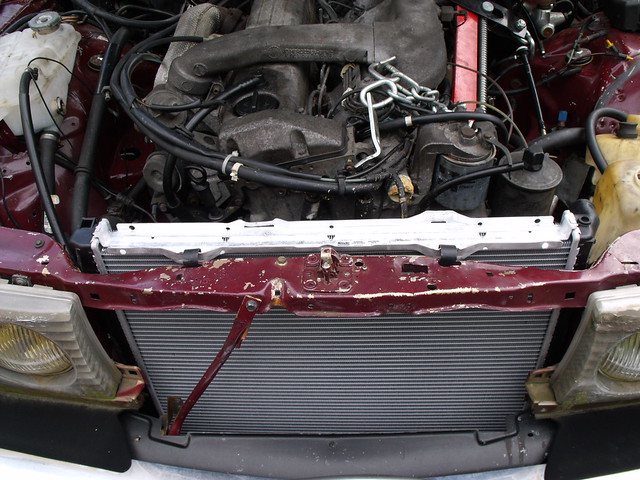
__________________
Onus probandi incumbit ei qui dicit, non ei qui negat I recondition w123/w126/w124/w140/r107/r129/ steering boxes! 1984 300D "Elsa" odo reset 6/2011 147k 1983 300TD "Mitzi" ~268k OM603 powered 1995 E300 "Adelheid" 262k [Sold]
|
|
#20
08-12-2016, 08:01 AM
|
|||
|
|||
|
And yes, the hood does close.
  Back to the cluster. I realized the w123 617 tach gets one signal per turn of the balancer and the 603 gets something like 400 per turn. So simply plugging the tach pickup into the 123 tach wasn't going to work. Looking at both clusters I found that I could swap the 87 300TD tach innards into the 83 300TD cluster. Sorry, no pictures of the actual swap, but everything was plug and play. This is the w123 cluster with the w124 tach board installed. The clock did a little funny shift, but it's almost unnoticeable.  This is the rear. The board on the left is the old w123 tach. 
__________________
Onus probandi incumbit ei qui dicit, non ei qui negat I recondition w123/w126/w124/w140/r107/r129/ steering boxes! 1984 300D "Elsa" odo reset 6/2011 147k 1983 300TD "Mitzi" ~268k OM603 powered 1995 E300 "Adelheid" 262k [Sold] Last edited by martureo; 08-17-2016 at 10:04 PM.
|
|
#21
08-12-2016, 08:14 AM
|
|||
|
|||
|
On to the fun stuff.
I wanted to shift the engine back a bit to provide clearance between the power steering pulley and the windshield washer bottle bracket. And to the passenger's side to provide clearance between the steering box and the starter. As of right now the shift is 1.4" to the rear and 1.75" to the passenger's side. The w123 engine mounts are 22" inches apart whereas the original engine arms were only 20" apart. So there was 2" for spacers. I made one spacer 3/8" (pass side) and the other 1.875" (drivers side). (Yes, that's more than 2", but who cares  ) )I still have to get it in the car and verify these spacers but they are the second round prototypes and have already seen a bit of modification. This is the driver's side spacer. It's 6061 Aluminum using the original mounting holes (counterbored holes in plate) which were M6 bolts. I've drilled and tapped the shifted holes for 5/16" Helicoils. The block is 1.875" thick.  And here's the arm placement for better reference.  Here's the passenger side spacer plate. It's 1018 low carbon steel, 3/8" thick. I'm mounting the plate using the original M8 fasteners, but flatheads so the shifted engine arm can clear. The arm will be mounted using 5/16" PEM studs pressed into the plate.  And here it is with the mount arm. (It's actually mounted upside down from the way it will be, but I was tired when I took this picture) 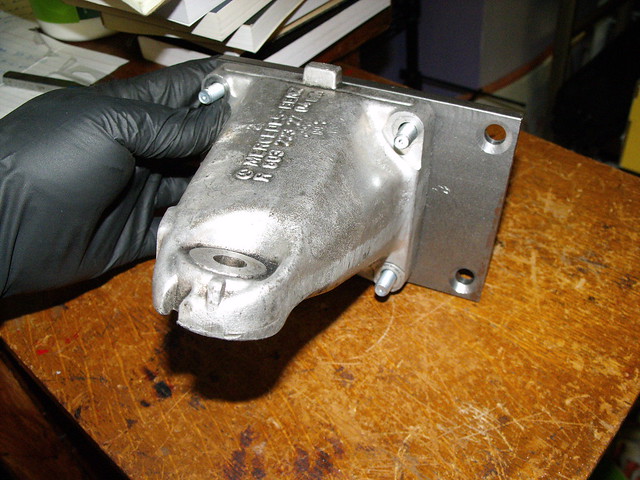 Once everything is in and fits I'll post CAD drawings of each spacer. And maybe a link to a STP file if I can figure out how to host it.
__________________
Onus probandi incumbit ei qui dicit, non ei qui negat I recondition w123/w126/w124/w140/r107/r129/ steering boxes! 1984 300D "Elsa" odo reset 6/2011 147k 1983 300TD "Mitzi" ~268k OM603 powered 1995 E300 "Adelheid" 262k [Sold]
|
|
#22
08-12-2016, 08:16 AM
|
|||
|
|||
|
Next week I'll try to post some pictures of the oil cooler lines/oil cooler adapted to AN lines, the oil cooler mount and the SLS hard line reroute to the driver's side.
__________________
Onus probandi incumbit ei qui dicit, non ei qui negat I recondition w123/w126/w124/w140/r107/r129/ steering boxes! 1984 300D "Elsa" odo reset 6/2011 147k 1983 300TD "Mitzi" ~268k OM603 powered 1995 E300 "Adelheid" 262k [Sold]
|
|
#23
08-12-2016, 08:40 AM
|
|||
|
|||
|
And here's some weird eye candy for you. I had the intake hot tanked and media blasted. It's been painted with engine block paint, color "Cast Aluminum."
Kinda makes the rest of the engine look terrible by contrast. I'll have to do something about that at some point. 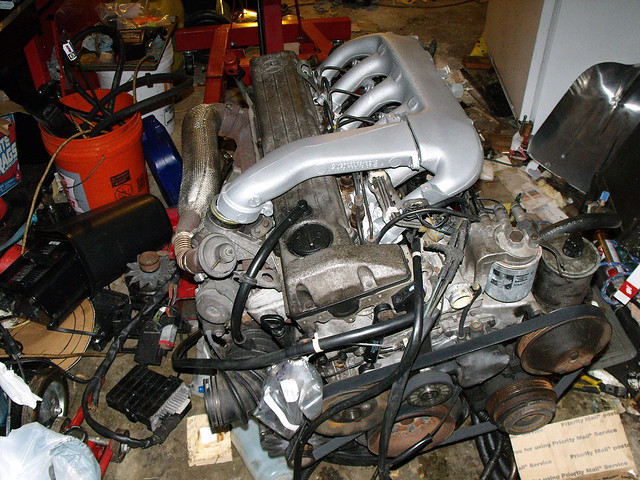
__________________
Onus probandi incumbit ei qui dicit, non ei qui negat I recondition w123/w126/w124/w140/r107/r129/ steering boxes! 1984 300D "Elsa" odo reset 6/2011 147k 1983 300TD "Mitzi" ~268k OM603 powered 1995 E300 "Adelheid" 262k [Sold]
|
|
#24
08-17-2016, 10:59 PM
|
|||
|
|||
|
So I'm not gonna make it to Chad's in the wagon. I've lost two nights of working time to weather and well, life in general. Two nights to work on it and I still don't have a bunch of necessary stuff.
Although it poured tonight I was able to get some things done in the garage. Most likely I'll get the engine back in tomorrow night. The w123 oil cooler had a replacement fitting, p/n 915013-013002. I bought two from the dealer at ~$5 each just for giggles. Peachparts login required to see http://www.peachparts.com/shopforum/members/jdr01-albums-oil-cooler-nipple-rapair.html This new "nipple" is M18 1.5mm requiring a tap drill of 16.5mm [.6496in] (round up to .6562 in = 21/32 drill). Since I wanted to go to AN lines (for easier replacement) I went with the closest NPT size as NPT to AN fittings are pretty common. I chose a AN-10 to 1/2" NPT as the 1/2 NPT tap drill is 11/16 (.6875"), not too far from the MB repair nipple. I cut the lines (which would not come off) with a cutoff wheel, removing the old nipple as well. (This is part of the MB nipple repair) This left the hex face to drill and tap. Drilled and tapped. 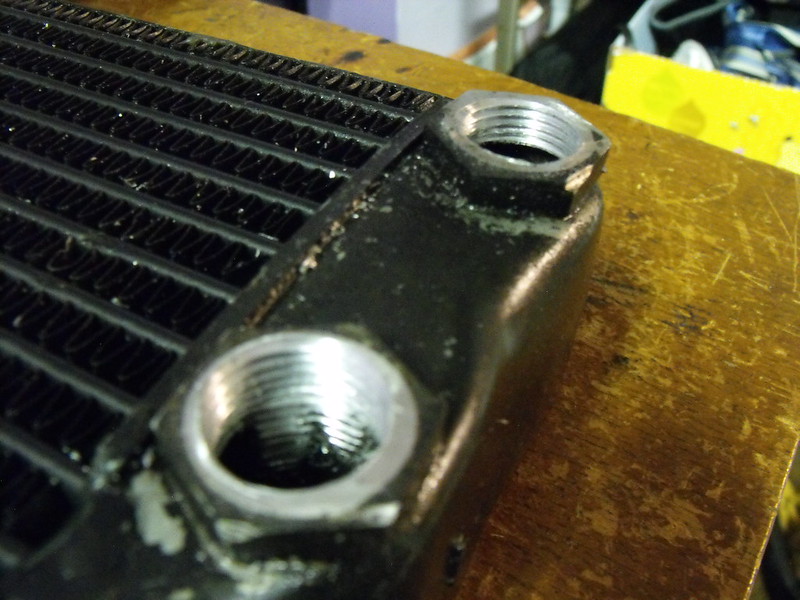 NPT to AN fittings finger tight. 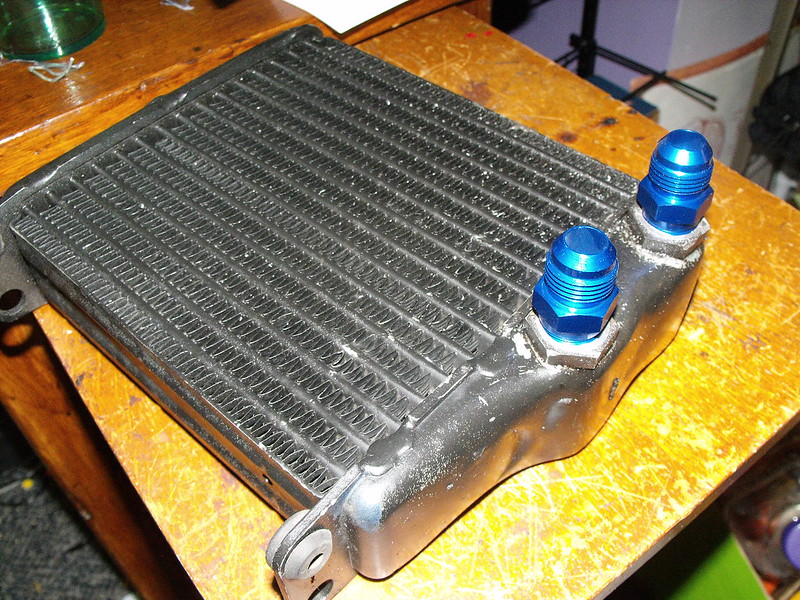 These are some extra lines I made up for my w123 daily driver once I got around to swapping the oil cooler with a modified one. The lines going to be installed are similar. I had some non-anodized fittings around here somewhere, but meh. 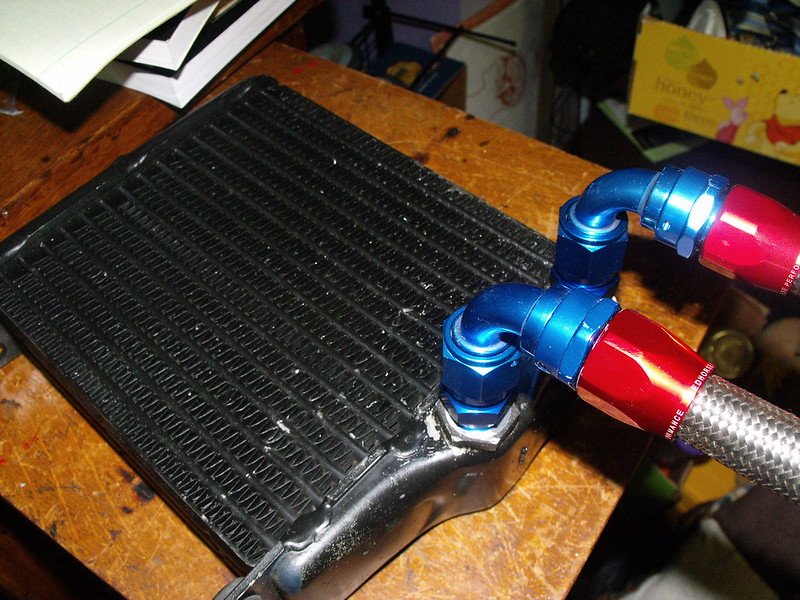 These are the original oil cooler hard lines with AN bungs welded on. The guy I had do them said he had to redo them several times as the steel was porous. But he ended up testing them to 150 PSI for me once finished.  That's all for tonight.
__________________
Onus probandi incumbit ei qui dicit, non ei qui negat I recondition w123/w126/w124/w140/r107/r129/ steering boxes! 1984 300D "Elsa" odo reset 6/2011 147k 1983 300TD "Mitzi" ~268k OM603 powered 1995 E300 "Adelheid" 262k [Sold]
|
|
#25
08-18-2016, 06:57 PM
|
||||
|
||||
|
Nice job so far. Have you considered using a 1984-1985 tachometer? I think they should be similar to the 603's tach. Since you modified it already, a little bit late.
Keep up with posting pics though.
__________________
1983 123.133 California - GreaseCar Veg System 
|
|
#26
08-26-2016, 09:53 PM
|
|||
|
|||
|
Next update.
I already installed a w126 brake booster and needed a modified brake booster line for the shortened length. Now I needed a longer length for the 603 and I grabbed one from an SDL. The SDL one was too long and I heard from a friend that they don't make them anymore, so instead of cutting it up I went and found an alternate tubing. (The SDL booster line is now for sale). I removed the old tubing from the front section of a w123 300TD line but cutting if off the barbs. Installed the tubing on the barb for the vacuum pump first. I widened the tubing with a punch dipped in hot water, then set the tubing and the fitting in boiling water for a few minutes before installing the hose over the barb. Then I installed the front fitting and the rear to figure out the length and repeated the process to install the hose on the center barb. Hose used: McMaster 9149T15 (Weld-Spatter-Resistant Polyurethane Tubing, One Layer, 5/16" ID, 1/2" OD, Black). Here it is next to the longer SDL booster line. The difference in length is about 6 inches.  The other big hurdle is the radiator fans. Yes, the fans actually fit the gap between the radiator and the engine, but just barely. They are two 12" Mishimoto thinline fans. I had to shift them to one side to clear the power steering pulley which sticks out just a bit too far. I'm returning these and have ordered a 17" Derale High output two speed fan in their place. The biggest issue is that the lower fan sticks over the edge of the radiator about three inches and interferes with the body. I really didn't feel like bending any sheet metal and I was already trying to wire these to trigger at two different temps. The Derale is a two speed, so.... I'll end up putting a pusher fan in when I install the a/c condenser, so if it's not enough I can add a temp trigger for that one. 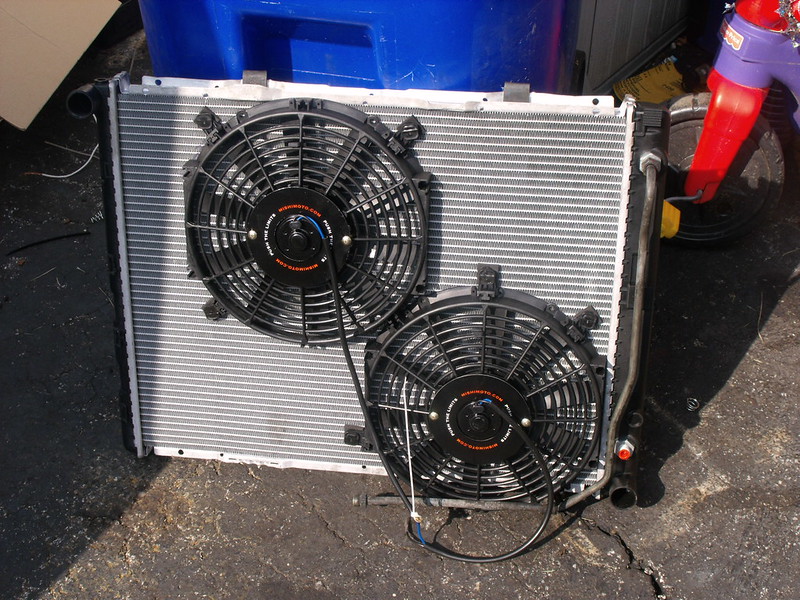 More updates tomorrow.
__________________
Onus probandi incumbit ei qui dicit, non ei qui negat I recondition w123/w126/w124/w140/r107/r129/ steering boxes! 1984 300D "Elsa" odo reset 6/2011 147k 1983 300TD "Mitzi" ~268k OM603 powered 1995 E300 "Adelheid" 262k [Sold]
|
|
#27
06-07-2017, 07:18 PM
|
|||
|
|||
|
So "tomorrow" took almost a year.
The Derale 17" fits great and I've finally fit the oil cooler the way I like it (inside the drivers fender directly in front of the wheel). I still have to duct a bit and create a mesh to cover the hole in the body to protect from debris and get the right length of hose for the AN lines. But there's progress. Latest progress has been trying to figure out how to wire up the fan with coolant temp sensors and relays so I can use the two speed capability. This initial diagram was what I was planning to use with the two Mishimoto fans. I'm posting it in case it helps anyone else.  This one is what I'm using. Two temp sensors (pics below): a low 87/82°C and a high 95/90°, and two relays. The relays are Mercedes (again pictured below) with replaceable internal fuses. 15A and 30A. 
__________________
Onus probandi incumbit ei qui dicit, non ei qui negat I recondition w123/w126/w124/w140/r107/r129/ steering boxes! 1984 300D "Elsa" odo reset 6/2011 147k 1983 300TD "Mitzi" ~268k OM603 powered 1995 E300 "Adelheid" 262k [Sold]
|
|
#28
06-07-2017, 07:34 PM
|
|||
|
|||
|
Here are a few relays. I'm only using the 15A and 30A but Mercedes does make more. I can't remember which one I ordered and which one I picked up at a junkyard, but all are still available from the dealer (can't remember the price but it wasn't much).
These are just like the ice cube relays EXCEPT that the fuse is external to the case and replaceable. Part numbers: 15A -- 002 542 01 19 30A -- 001 542 96 19 40A -- 001 542 97 18 I will be putting in a 10A fuse in the 15A relay and a 20A Fuse in the 30A Relay. 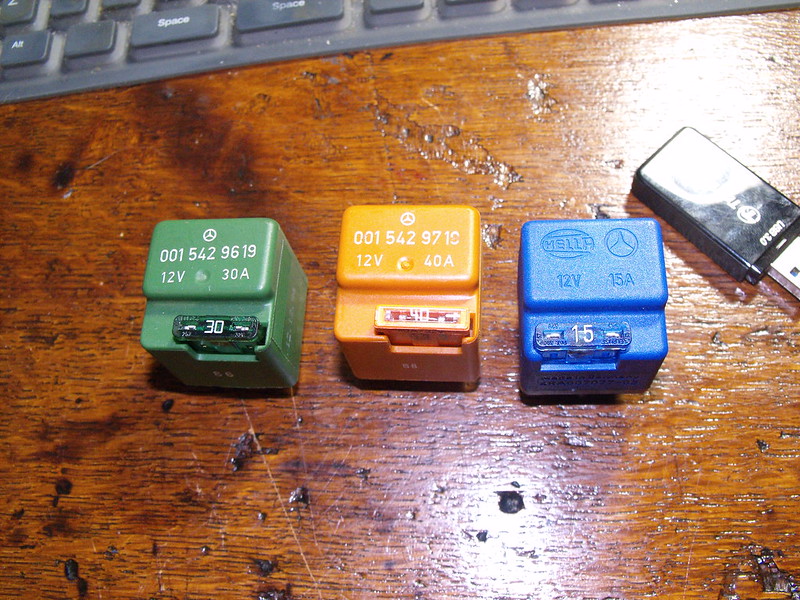  These are the coolant temp sensors that I'll be using. I'm not sure the location of each yet but that'll come soon. Part numbers will vary as these are used on plenty of marques including Volvo, BMW, etc. But I know these will fit the threads of the coolant ports on the OM603. FAE: 87/82 °C -- 36050 95/90 °C -- 36010 
__________________
Onus probandi incumbit ei qui dicit, non ei qui negat I recondition w123/w126/w124/w140/r107/r129/ steering boxes! 1984 300D "Elsa" odo reset 6/2011 147k 1983 300TD "Mitzi" ~268k OM603 powered 1995 E300 "Adelheid" 262k [Sold]
|
|
#29
03-05-2018, 08:07 PM
|
|||
|
|||
|
Martureo did you finish this project ?
|
 |
| Bookmarks |
|
|


 Linear Mode


