

|
|
|
|
|
|
#46
 12-06-2016, 07:18 PM
|
||||
|
||||
|
Quote:
.
__________________
1983 123.133 California - GreaseCar Veg System 

|
|
#47
12-07-2016, 10:55 AM
|
|||
|
|||
|
What all do I need to remove from the interior of the car to replace the windshield? I see 68-405 mentioned "R&R of reveal molding on windshield" in the FSM, but I have no idea what part that is as the pictures are horrible on the online FSM.
Thanks!
__________________
'85 300D - federal spec, built in late 84. 85 300D Complete AC System Rebuild
|
|
#48
12-07-2016, 11:02 AM
|
|||
|
|||
|
3M offers body putty in pre-made strips about 1/4" in diameter - you just peel the "snakes" off the backing paper and put them where you need them, like around the outside of the channel. Should be available at any of your local auto paint supply shops.
Dan
|
|
#49
12-07-2016, 11:20 AM
|
||||
|
||||
|
Reveal mouldings are the plastic pieces covering the A pillars. Whatever is in the way to allow you a clear path to see what you are doing and pull the rope from inside has to be out of the way.
Anything you put on the pinch-weld has to be water proof. I don't think body filler is water proof and will absorb moisture/ rot over time.
__________________
85 300D turbo pristine w 157k when purchased 161K now 83 300 D turbo 297K runs great. SOLD! 83 240D 4 spd manual- parted out then junked
|
|
#50
12-07-2016, 11:50 AM
|
|||
|
|||
|
Thanks funola
I will use epoxy as filler instead of body filler then. Actually, I'll probably use POR Patch instead of JB-weld, since it has rust inhibitors and doesn't require mixing.
__________________
'85 300D - federal spec, built in late 84. 85 300D Complete AC System Rebuild
|
|
#51
12-07-2016, 12:27 PM
|
||||
|
||||
|
Whatever you use should be able to be leveled smooth without sanding so you don't scratch the paint and allow moisture to get in. You want to get the pinch-weld frame as smooth as possible for the best possible seal.
__________________
85 300D turbo pristine w 157k when purchased 161K now 83 300 D turbo 297K runs great. SOLD! 83 240D 4 spd manual- parted out then junked
|
|
#52
12-07-2016, 04:09 PM
|
|||
|
|||
|
Quote:
Nope. This is body putty and is made for exactly this sort of thing. I've also heard it called dum-dum and body caulk. I'll go look and see if I can find an Internet source. Believe me, I'd never suggest body filler for this kind of purpose. Here's a link: This is black in color (I'm used to seeing it in tan) but that might be better for what you're doing. Interesting that O'Rileys has it. Dan
|
|
#53
12-12-2016, 11:55 AM
|
|||
|
|||
|
I think Dan & Funola are talking about two different things. Funola, you're talking about the filler I use to smooth out the rust repair - while Dan, you're talking about the sealer to use during glass installation? I decided to pony up the extra money for the OEM sealant to use for the glass install, just to be safe.
I've got the rusted out area cleaned up top and bottom and ready to patch, just need to use the POR-15 degreaser and rust treatment before I can do the actual patch. I scraped away the old seam sealers (it seems like they used two kinds - one hard and the other flexible, like it's rubber based. Found a bit of surface rust behind the old seam sealer, but I've been able to clean up most of that with a variety of wire brushes - should be good to treat the rest. I'm thinking I'll use POR putty as a body filler on the top side, as well as a seam sealer. I should be able to get it fairly smooth without sanding, but if i I do need to sand it I'll topcoat it with a layer of POR 15 to smooth it, then I'll prime and paint it. I should have been able to get by with touch-up paint only, but unfortunately during the filing process I slipped a couple times and scratched the paint on the cowl panel. There were also some scratches in the paint from before I bought the car, so I think I'm going to respray that one panel only. Hopefully my color-matched paint is a good match. I think I'll do a test panel on some scrap steel to be sure. Any tips on removing the old black sealant from the frame? I've been using a plastic scraper to avoid gouging the paint. Is there a chemical that will soften it, or should I try heating it up? (My garage is about 55F right now, so that's not helping anything I'm sure)
__________________
'85 300D - federal spec, built in late 84. 85 300D Complete AC System Rebuild
|
|
#54
12-12-2016, 12:13 PM
|
|||
|
|||
|
Mineral spirits/paint thinner (not reducer) to soften and remove the sealer OR heat gun on low. A 3M scratch pad (red) or finer helps.
The POR15 epoxy putty works great. I've been using the "J-B Water Weld" as a replacement for the POR15 putty. I have a suspicion it is the same stuff with a slightly different formulation. Not any better but it is available at almost any hardware store.
__________________
Whatever story you're telling, it will be more interesting if, at the end you add, "and then everything burst into flames. ― Brian P. Cleary, You Oughta Know By Now
|
|
#55
12-12-2016, 12:20 PM
|
|||
|
|||
|
Quote:
__________________
'85 300D - federal spec, built in late 84. 85 300D Complete AC System Rebuild
|
|
#56
12-12-2016, 12:23 PM
|
||||
|
||||
|
If it's only the non hardening OE sealant, Brakeclean with a cloth and elbow grease gets it spotless and leaves a grease free surface ready for roping. Here's what mine (rear pinch-weld) looked like after the old sealant been totally removed.

__________________
85 300D turbo pristine w 157k when purchased 161K now 83 300 D turbo 297K runs great. SOLD! 83 240D 4 spd manual- parted out then junked
|
|
#57
12-12-2016, 03:43 PM
|
|||
|
|||
|
If you are going to use the Brakleen or any other spray cleaner to remove the sealant do it BEFORE you do the patch repair.
Most of those cleaners will attack the composition of the patching materials. I did a little digging and it appears the J-B Water Weld and the POR-15 putty use the same basic elements. They differ in their mix agents. The Water Weld uses a glycol carrier and the POR doesn't list theirs. The J-B stuff sets and cures faster than the POR. Something to take into consideration if you're doing a larger repair. They claim 25 minutes working time but I find over 15 minutes becomes iffy. The POR can be worked for about an hour depending on temperature, humidity, etc. Both of them fully cure in 24 hours. The POR-15 is a much more economical approach if you are doing a larger area. About $35.00 USD for one pound vs. $8.00 USD for 2 oz of the J-B. They both keep well. I had a pack of the POR in my tool box for over two years and it was still usable. It took a bit more mixing than when it was fresh but no other problems. I have a small partially used tube of the J-B on my desk which I use occasionally. It's been opened and closed numerous times over the last 3 months with no apparent degradation.
__________________
Whatever story you're telling, it will be more interesting if, at the end you add, "and then everything burst into flames. ― Brian P. Cleary, You Oughta Know By Now
|
|
#58
12-12-2016, 04:29 PM
|
|||
|
|||
|
Ack. I keep mixing up two different products. I was thinking of POR Patch, rather than POR Putty, to act as a filler. I guess either one would work though. I think the putty is best used over POR 15 (the paint), while POR Patch is thickened POR 15, which would imply that it could be used directly over treated metal. I've used the putty before and have plenty leftover, but just got a tube of the patch material, so I haven't tried it yet. I guess I can just experiment with the two products on a bit of scrap metal to see which I prefer.
Thanks for the tip on the brake cleaner. I'll be careful to avoid that area, or use it before I make the repair. (I was planning on using POR-15's degreaser and rust converter on the repair area before I begin the repair.) Hopefully tonight I can make some progress. I messed up my back (again) and have to be very careful of how much I exert myself.
__________________
'85 300D - federal spec, built in late 84. 85 300D Complete AC System Rebuild
|
|
#59
01-06-2017, 11:48 AM
|
|||
|
|||
|
I finally got time to finish the rust repair, and I'm hoping to install the glass this weekend (Just in time for the roads to be covered in salt, so the car won't be driving anywhere..)
Here's a bit of information about how I repaired the area without a welder. I'm pretty sure this will last at least as long as the rest of the car now. Products used: Eastwood Rust Repair Kit POR-15 and prep solutions POR Epoxy putty POR patch Sandpaper, paintbrushes, wire brushes, scotch brite, scrapers, degreaser, etc. Here's what it looked like before:  The first step was to clean the affected area, as well as the entire windshield frame and remove the old sealer. I found that WD-40 was the most effective way to soften the old sealer to scrape it off, but in some places I had to sand through the hardened sealer. (I believe the windshield and sealer was original to the car, but in some places the sealer hardened and was stronger than the nearby paint. I thoroughly wire-brushed the patch area to get down to as clean of metal as possible. Barrel brushes on a drill worked well to clean the bottom area, and a Dremel worked well on the top side.  Next up, I prepped the area and applied 2 coats of POR 15  Next it was time to patch the rust. I used the Eastwood Rust Repair kit as instructed, essentially it contains a backer piece of solid fiberglass, some 2 part epoxy, a plastic rod, and a bent piece of metal. The idea is that you cut the fiberglass slightly larger than the damaged area, drill a small hole in it, then apply epoxy to the top of the fiberglass and the bottom of the damaged area. The plastic rod is inserted through the fiberglass, and tensioned using the bent piece of metal while the epoxy cures. I made sure to roughen the fiberglass as well as the back of the repair area to promote adhesion. Once it cures, you cut the plastic rod flush and then bodywork the area. 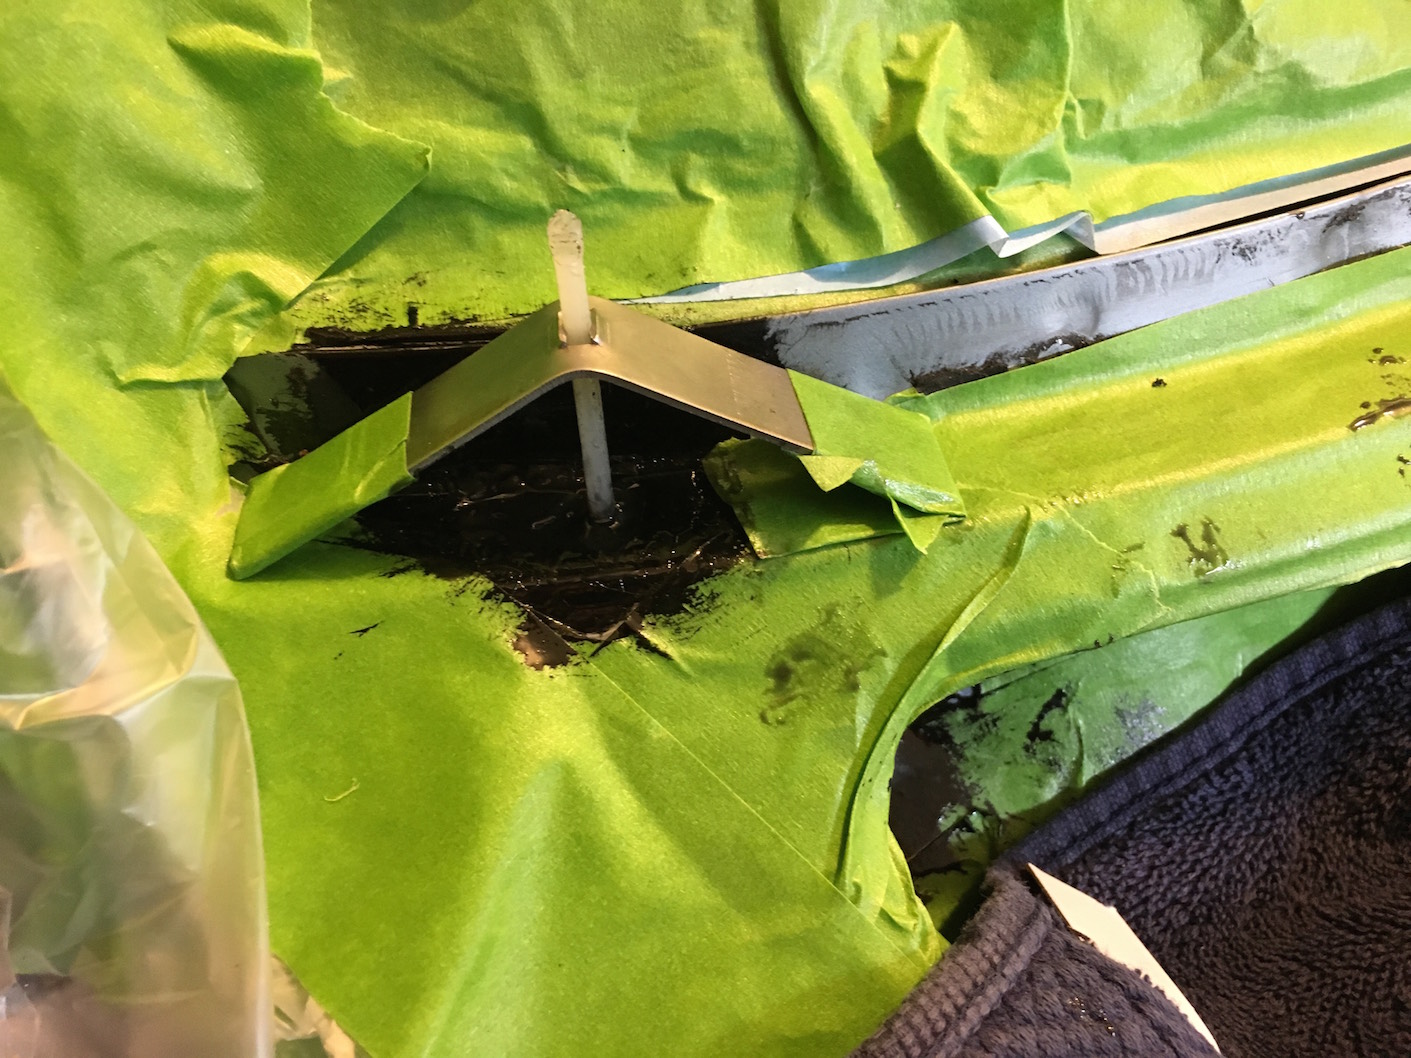 Unfortunately, after two days the epoxy seemed to be cured, but it was still a bit soft. I'm not sure if this was intentional to allow some flex in the panel or not, but since I'm repairing an area that is prone to gathering water, I wanted a harder finish. I was able to use a steel brush on a Dremel to clean the hardened epoxy out of the visible patch area. I left the epoxy in between the fiberglass and metal, as well as on the bottom. I then filled the area with several thin coats of POR Patch, sanding between coats to level the surface.   Next up, I added some additional reinforcement to the back side of the patch. I used POR Epoxy Putty on the back side of the repair, building a layer over the patch and into the seams where the various pieces of metal joined. Once this cures, I'm fairly certain the patch will never move. Finally, I applied 3 coats of POR-15 to the windshield frame area, being careful to mask slightly inside of where the weatherstrip sits, and paying special attention to the rust repair area. I'll unmask this tonight and cross my fingers that I had no bleed-through of the paint.  Now I'm ready to install the glass as soon as I can get an extra set of hands. I'm planning on using 3m Strip Caulking as the primary seal between weatherstrip and metal. The MB sealant I bought is only a 50ml tube - I'll use that to fill any areas that need additional sealant, as well as hopefully between the glass and rubber. I've still got to touch up the paint where the repair is visible. I've got both a spray can and touch up pen of color matched paint, but it's not a 100% perfect match. I'm not sure how I'll deal with that right now. My garage is a bit too cold to try to paint in right now anyway.
__________________
'85 300D - federal spec, built in late 84. 85 300D Complete AC System Rebuild
|
|
#60
01-07-2017, 10:39 PM
|
|||
|
|||
|
Not bad at all! Hope it holds up for you.
Dan
|
 |
| Bookmarks |
|
|


 Linear Mode


