

|
|
|
|
|
|
|||||||
 |
|
|
LinkBack | Thread Tools | Display Modes |
|
#91
 04-08-2013, 05:01 PM
|
||||
|
||||
|
Quote:
__________________
 All Diesel Fleet 1985 R107 300SLD TURBODIESEL 2005 E320 CDI (daily) LOTS of parts for sale! EGR block kit http://www.peachparts.com/shopforum/diesel-discussion/355250-sale-egr-delete-block-off-plate-kit.html 1985 CA emissions 617 owners- You Need This! Sanden style A/C Compressor Mounting Kit for your 616/ 617 For Sale + Install Inst. Sanden Instalation Guide (post 11): http://www.peachparts.com/shopforum/diesel-discussion/367883-sanden-retrofit-installation-guide.html 
|
|
#92
04-08-2013, 06:30 PM
|
||||
|
||||
|
Updated fasteners
I have updated the fasteners in the kits now being sold. The fastener/hardware packet will include:
2- Socket Head Cap Screws, nuts, washers- Compressor mounting bolts 4- 3/8 Machine bolts, nuts, washers- "Banana" bracket to compressor bolts 3- M8 Machine bolts, lock washers- Plate to engine bolts 1- 3/8 Machine bolt & nut- Slotted adjusting bracket to plate bolt 1- M12 lock nut- For long bolt (used) Plate to engine (no washers used) 1- Long 3/8 Bolt & nut- Adjusting bolt sleeves between "Banana" bracket 1- M6 bolt & nut- Oil cooler line clamp (used) on relocation bracket 1- Long 3/8 Allthread Bolt & jamb nut- Adjusting bolt 2- Cad Plated sleeves- Mounted between "Banana" brackets 
__________________
All Diesel Fleet 1985 R107 300SLD TURBODIESEL 2005 E320 CDI (daily) LOTS of parts for sale! EGR block kit http://www.peachparts.com/shopforum/diesel-discussion/355250-sale-egr-delete-block-off-plate-kit.html 1985 CA emissions 617 owners- You Need This! Sanden style A/C Compressor Mounting Kit for your 616/ 617 For Sale + Install Inst. Sanden Instalation Guide (post 11): http://www.peachparts.com/shopforum/diesel-discussion/367883-sanden-retrofit-installation-guide.html
|
|
#93
04-09-2013, 09:13 AM
|
|||
|
|||
|
Quote:
I see there are slightly different mounting hardware which is preferred. My indie found the same solution was needed. At this time I have zero time to pick up the car from him and thus will not have a final report on the new system until most likely next week.
|
|
#94
04-12-2013, 11:53 PM
|
|||
|
|||
|
I found both all-metal lock nuts at Ace. I posted to the other thread.
|
|
#95
04-16-2013, 09:39 PM
|
|||
|
|||
|
My car is done and the a/c is cold and nice. It actually cools the whole wagon, which the old unit never did. The front fan is now on a pressure switch rather than the temp switch. The first day (and test day) it was about 90 degrees out. I'm happy- but remember I did not use a sanden unit- I got a seltec. I may use a sanden on the next wagon (its cheaper) - I bought two kits.
|
|
#96
04-17-2013, 12:26 AM
|
||||
|
||||
|
Quote:
I am working on making Sanden style compressors available with the mounting kits. I may eventually have hose assemblies available as well...Rich
__________________
All Diesel Fleet 1985 R107 300SLD TURBODIESEL 2005 E320 CDI (daily) LOTS of parts for sale! EGR block kit http://www.peachparts.com/shopforum/diesel-discussion/355250-sale-egr-delete-block-off-plate-kit.html 1985 CA emissions 617 owners- You Need This! Sanden style A/C Compressor Mounting Kit for your 616/ 617 For Sale + Install Inst. Sanden Instalation Guide (post 11): http://www.peachparts.com/shopforum/diesel-discussion/367883-sanden-retrofit-installation-guide.html Last edited by ROLLGUY; 04-19-2013 at 08:34 PM.
|
|
#97
04-17-2013, 09:02 AM
|
|||
|
|||
|
Looks good ROLLGUY! I have two Euro 123's with US aftermarket Sanden based a/c. Both of them appear to be the same kit and both use an idler for belt tensioning. I am of the opinion that it is the way to go.
Best of luck with your venture!
__________________
2001 SLK 320 six speed manual 2014 Porsche Cayenne six speed manual Annoy a Liberal, Read the Constitution
|
|
#98
04-19-2013, 08:14 PM
|
|||
|
|||
|
Some of the fastening hardware needed to be altered- hex head instead of 6 point, and using the non nylock etc. Frankly just details. Also it appears without a exact model of compressor you need to individually find and fit the rear lines.
I had my indie to the install, so I can not comment on how hard it was- but as every job there are three parts: time, knowledge and money. I don't have time- but I have the other two. I agree it most likely matters not if the unit is a sanden or seltec. In the end I'm happy.
|
|
#99
04-19-2013, 09:09 PM
|
|||
|
|||
|
Quote:
__________________
Sam 84 300SD 350K+ miles ( Blue Belle )
|
|
#100
04-19-2013, 11:42 PM
|
|||
|
|||
|
Quote:
 $2600 into my 82 wagon and this a/c upgrade was part of it. I did not have time to ask all the detailed questions. $2600 into my 82 wagon and this a/c upgrade was part of it. I did not have time to ask all the detailed questions.
|
|
#101
04-20-2013, 01:08 AM
|
||||
|
||||
|
Quote:
__________________
All Diesel Fleet 1985 R107 300SLD TURBODIESEL 2005 E320 CDI (daily) LOTS of parts for sale! EGR block kit http://www.peachparts.com/shopforum/diesel-discussion/355250-sale-egr-delete-block-off-plate-kit.html 1985 CA emissions 617 owners- You Need This! Sanden style A/C Compressor Mounting Kit for your 616/ 617 For Sale + Install Inst. Sanden Instalation Guide (post 11): http://www.peachparts.com/shopforum/diesel-discussion/367883-sanden-retrofit-installation-guide.html
|
|
#102
04-30-2013, 03:48 AM
|
||||
|
||||
|
Quote:
The GH rear head has the similar manifold pad as the R4 setup. The advantage is that it can use the same hoses as in the stock with a little modifications. The GH rear head will put the Sanden compressor 90° towards the passenger side and will use sealing washers to seal the connection. In researching more, I think the QC head would use the same type of O-Rings as in the original Harrison R4. Here are pics of the GH rear head setup.  Shot of the GH rear head.   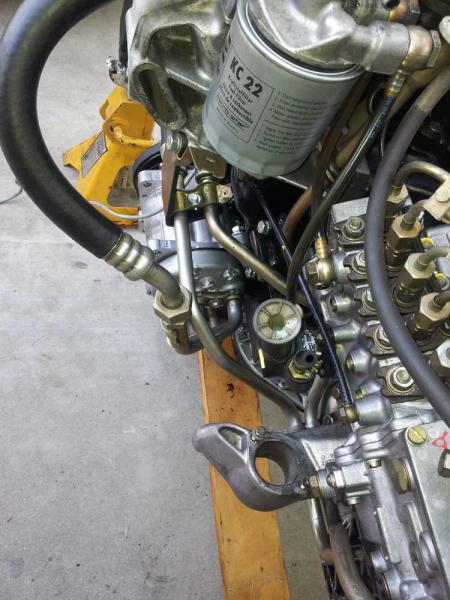  .
__________________
1983 123.133 California - GreaseCar Veg System 
|
|
#103
04-30-2013, 03:54 AM
|
||||
|
||||
|
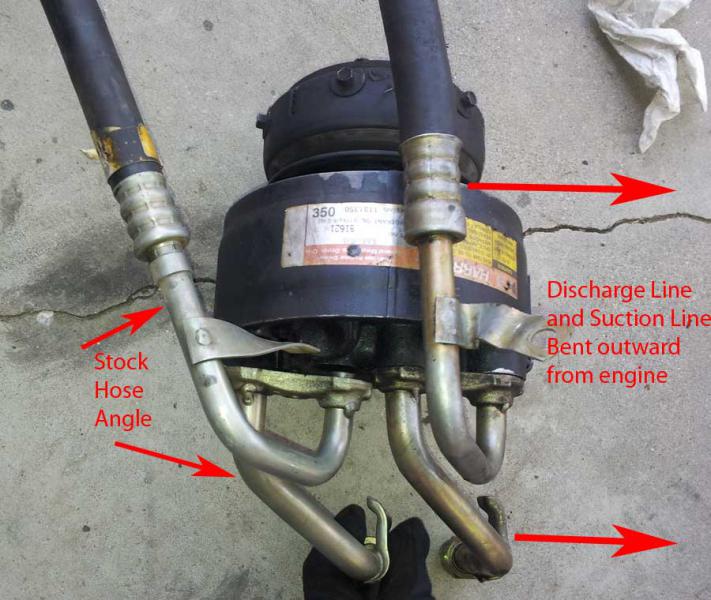
This pic shows how much I bent the modified manifold to make it work with the Sanden. EDIT: this pic shows the bottom of the compressor.
 The oil cooler lines had to be placed closer to the engine block in order for the Suction line to clear the side.  The discharge lower rubber hose will need to be lengthen to be properly seated underneath the fan shroud as in the stock setup. 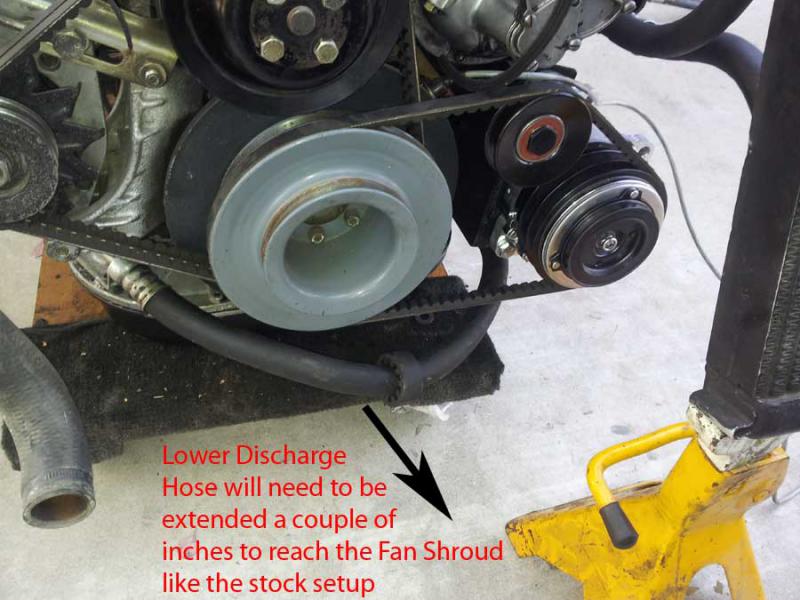 The GH head uses a smaller diameter center mounting bolt. To prevent potential movement, I made a bushing to close the gap on the manifold. 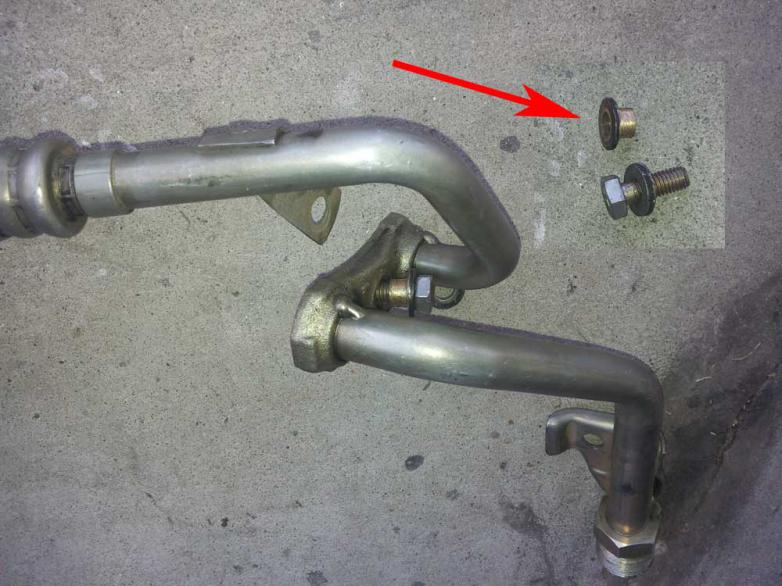 I have a ways to go with this project. I still need to rip apart the dash so I can clean out the evaporator. I'm dreading this task and just dragging my feet on it. I'm putting in new hoses and a new parallel condenser that larger than my existing one. I'm looking forward to when this done. .
__________________
1983 123.133 California - GreaseCar Veg System
Last edited by DeliveryValve; 05-09-2013 at 10:32 PM.
|
|
#104
04-30-2013, 09:54 AM
|
||||
|
||||
|
Quote:
__________________
All Diesel Fleet 1985 R107 300SLD TURBODIESEL 2005 E320 CDI (daily) LOTS of parts for sale! EGR block kit http://www.peachparts.com/shopforum/diesel-discussion/355250-sale-egr-delete-block-off-plate-kit.html 1985 CA emissions 617 owners- You Need This! Sanden style A/C Compressor Mounting Kit for your 616/ 617 For Sale + Install Inst. Sanden Instalation Guide (post 11): http://www.peachparts.com/shopforum/diesel-discussion/367883-sanden-retrofit-installation-guide.html
|
|
#105
04-30-2013, 10:22 AM
|
||||
|
||||
|
I recently purchased a GH head and compressor. These are enroute and I hope to have pics by the middle of next week. My pics though will be with the engine IN the car.
Thanks, DeliveryValve, for your assistance.
__________________
daw_two Germantown, TN Links: Sold last car --- 05/2012 1984 300D Light Ivory, Red interior No longer selling Cluster Needles Paint No longer selling New Old Stock (NOS) parts Past: 3/2008 1986 300SDL "Coda" 04/2010 1965 190D(c) "Ben" & many more
|
|
| Bookmarks |
|
|


 Linear Mode


