Parts Catalog Accessories Catalog How To Articles Tech Forums
Call Pelican Parts at 888-280-7799
Shopping Cart Cart | Project List | Order Status | Help


Go Back   PeachParts Mercedes-Benz Forum > Mercedes-Benz Tech Information and Support > Diesel Discussion

Reply
 
LinkBack Thread Tools Display Modes
  #1  
Old 09-09-2011, 05:49 AM
Stretch's Avatar
...like a shield of steel
 
Join Date: Sep 2009
Location: Somewhere in the Netherlands
Posts: 14,461
722.118 Automatic transmission rebuild (Monster DIY)

Here's a DIY to encourage you all to take a closer look at your transmissions if you get a problem, rather than just swapping for another or buying reconditioned.

When I announced here on this forum (!) that I was about to rebuild my 722.118 I was basically told not to be silly and that I should be really scared. I was told under no circumstances to take the valve body to bits...

Having done it I don't know why: under perfect conditions I estimate this job would be achievable for a competent DIY mechanic in a weekend, perhaps a long weekend. Unfortunately, as has been the way with this car of mine, the conditions were less than what I consider to be perfect so it took about 4 months to get my ducks lined up.

The biggest problem I had was spares availability.

It has taken me nearly six times longer to write this up than it did to actually do the job.

Please note this DIY does NOT detail the process of adjusting the transmission when it has been fitted to the car. This DIY only covers taking it to bits and putting it back together again. I expect, when I get to it, that the adjustment process will be a challenge. That might be a future DIY but there are already some good threads on the subject (http://www.peachparts.com/Wikka/Trans722VacMod and a great compilation from whunter here Transmission:). There is also a load of information on Benz World (http://www.benzworld.org/forums/w123-e-ce-d-cd-td/1597891-diy-w123-transmission-diagnose-adjustment-722-a.html).

I could not have done this job so quickly (!) without the help of rs899 – thanks for all your help and encouragement.

__________________
1992 W201 190E 1.8 171,000 km - Daily driver
1981 W123 300D ~ 100,000 miles / 160,000 km - project car stripped to the bone
1965 Land Rover Series 2a Station Wagon CIS recovery therapy!
1961 Volvo PV544 Bare metal rat rod-ish thing

I'm here to chat about cars and to help others - I'm not here "to always be right" like an internet warrior


Don't leave that there - I'll take it to bits!

Last edited by Stretch; 09-14-2011 at 04:10 AM. Reason: Finished! Removed all messages that the pictures weren't uploaded yet
Reply With Quote
  #2  
Old 09-09-2011, 05:50 AM
Stretch's Avatar
...like a shield of steel
 
Join Date: Sep 2009
Location: Somewhere in the Netherlands
Posts: 14,461
Some information about automatic transmissions and the 722.1

Automatic gearboxes such as the 722.1 work by using hydraulic pressure to apply brakes or clutches to stop particular parts of a sun and planet gear system from turning. The 722.1 transmission has three sun and planet gear systems. (To read more general information about automatic gear boxes and sun and planet systems have a look at these links http://en.wikipedia.org/wiki/Automatic_transmission and http://en.wikipedia.org/wiki/Sun_and_planet_gear)

Here's a schematic of the 722.1 transmission
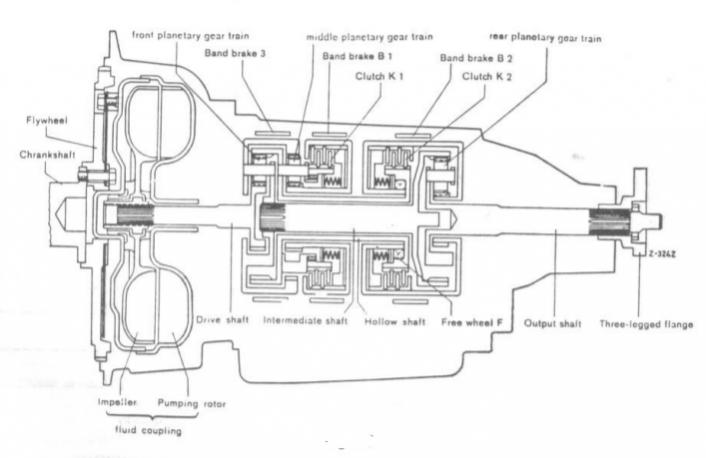


And here's a summary of the relationship between each element in the gear box and the desired gear.


I hope this will help with the many “is it my B2 piston” threads.

Here's a picture showing some names of the parts of the transmission.
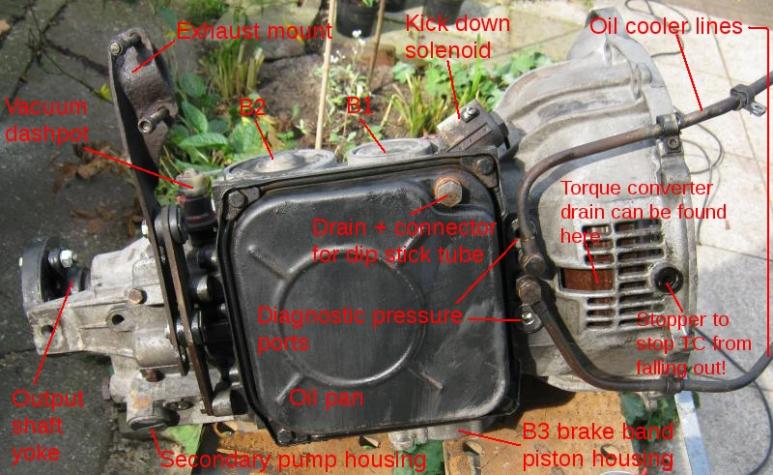


You can find a nice exploded parts diagram of the 722.1 transmission here (http://www.ganzeboom.net/images1/ganzeboom/parts/Mercedes/722.0,%20722.1,%20722.2.pdf).

I recommend you down load and print this pdf out before going any further!

At this stage I don't fully understand how a 722.1 transmission works. I can see how in principle it should,but there are certain parts such as the ident piston in the "tail cone" section that leave me thinking what the %^&^*& is that for?

If we get a long cold winter like we did last year I plan to work out exactly how the 722.1 (and perhaps also the 722.3) transmissions work. But that will be the subject of another thread.
Attached Thumbnails
722.118 Automatic transmission rebuild (Monster DIY)-722_1-schematic.jpg   722.118 Automatic transmission rebuild (Monster DIY)-auto_box-under.jpg  
__________________
1992 W201 190E 1.8 171,000 km - Daily driver
1981 W123 300D ~ 100,000 miles / 160,000 km - project car stripped to the bone
1965 Land Rover Series 2a Station Wagon CIS recovery therapy!
1961 Volvo PV544 Bare metal rat rod-ish thing

I'm here to chat about cars and to help others - I'm not here "to always be right" like an internet warrior


Don't leave that there - I'll take it to bits!

Last edited by Stretch; 09-12-2011 at 04:09 PM.
Reply With Quote
  #3  
Old 09-09-2011, 05:50 AM
Stretch's Avatar
...like a shield of steel
 
Join Date: Sep 2009
Location: Somewhere in the Netherlands
Posts: 14,461
Some information about the 722.118 transmission

Here's all the information that I'm sure about regarding the different configurations of the 722.118 transmissions. If anyone knows better please post a reply / PM / email me with your information. I need some help with this.

This particular transmission is only used in diesel engined (Mercedes) cars manufactured between about 1977(?) and 1983. Prior to about 1980 these transmissions have a non-vacuum adjusting mechanism and a solid linkage (so not a Bowden cable which came later) that is connected to the throttle linkage.

79 300D upshifting problem

After about 1980 changes were made to the shifting mechanism. I think the valve body was revised. What I know for sure is that the solid linkage to the throttle linkage was removed and a vacuum dash pot was fitted to the familiar rear position of the transmission just like the other 722.1 transmissions.

http://www.benzworld.org/forums/w123-e-ce-d-cd-td/1597891-diy-w123-transmission-diagnose-adjustment-722-a.html

If you are looking for shift point data for the 722.118 please take a look at the link on Benz World above, or on this thread Has anyone got 722.XXX diesel engined transmission shift point data? where I copied a summary of the same information.
__________________
1992 W201 190E 1.8 171,000 km - Daily driver
1981 W123 300D ~ 100,000 miles / 160,000 km - project car stripped to the bone
1965 Land Rover Series 2a Station Wagon CIS recovery therapy!
1961 Volvo PV544 Bare metal rat rod-ish thing

I'm here to chat about cars and to help others - I'm not here "to always be right" like an internet warrior


Don't leave that there - I'll take it to bits!

Last edited by Stretch; 09-09-2011 at 01:27 PM.
Reply With Quote
  #4  
Old 09-09-2011, 05:51 AM
Stretch's Avatar
...like a shield of steel
 
Join Date: Sep 2009
Location: Somewhere in the Netherlands
Posts: 14,461
Tightening torques

Attached Thumbnails
722.118 Automatic transmission rebuild (Monster DIY)-722_118-torque-values.jpg  
__________________
1992 W201 190E 1.8 171,000 km - Daily driver
1981 W123 300D ~ 100,000 miles / 160,000 km - project car stripped to the bone
1965 Land Rover Series 2a Station Wagon CIS recovery therapy!
1961 Volvo PV544 Bare metal rat rod-ish thing

I'm here to chat about cars and to help others - I'm not here "to always be right" like an internet warrior


Don't leave that there - I'll take it to bits!

Last edited by Stretch; 09-09-2011 at 06:18 AM.
Reply With Quote
  #5  
Old 09-09-2011, 05:51 AM
Stretch's Avatar
...like a shield of steel
 
Join Date: Sep 2009
Location: Somewhere in the Netherlands
Posts: 14,461
Preparation

Drain the oil from the torque converter and the transmission and remove it from the car if you haven't already done so.

Remove the torque converter from the front of the transmission – there should be a little plastic plug that needs to be pulled out of the casing and then you can just pull the torque converter off – cover it up and store it somewhere safe.

If the torque converter is stuck on and won't come off, you'll find lots of threads on this subject on the forum.

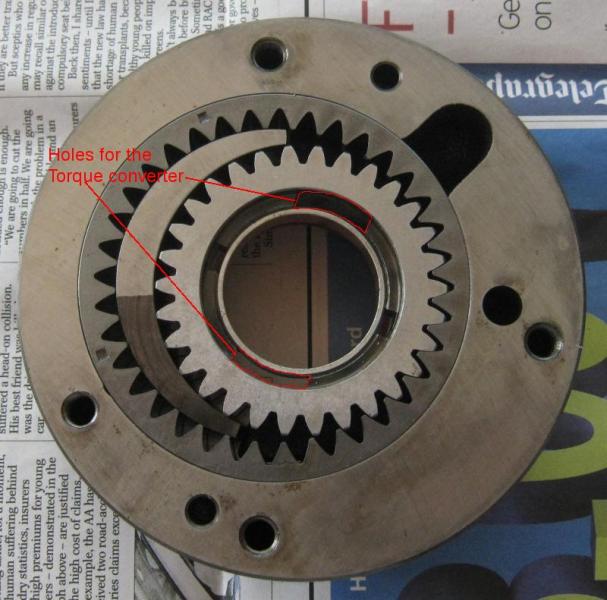
Two tabs on the torque converter slot into the primary pump as shown in the pictures below...


...apparently these tabs sometimes snap off. This weak point on the 722.1 was improved considerably on the 722.3 transmissions. (See post #43 by rs899 => 722.118 Automatic transmission rebuild (Monster DIY))

Clean the outside of the transmission as best you can with your favourite engine degreaser.
Attached Thumbnails
722.118 Automatic transmission rebuild (Monster DIY)-722_118-front-pump-holes-torque-converter.jpg   722.118 Automatic transmission rebuild (Monster DIY)-722_118-front-pump-holes-torque-converter-tabs.jpg  
__________________
1992 W201 190E 1.8 171,000 km - Daily driver
1981 W123 300D ~ 100,000 miles / 160,000 km - project car stripped to the bone
1965 Land Rover Series 2a Station Wagon CIS recovery therapy!
1961 Volvo PV544 Bare metal rat rod-ish thing

I'm here to chat about cars and to help others - I'm not here "to always be right" like an internet warrior


Don't leave that there - I'll take it to bits!

Last edited by Stretch; 09-11-2011 at 02:34 PM. Reason: Added information about the torque converter connection to primary pump
Reply With Quote
  #6  
Old 09-09-2011, 05:51 AM
Stretch's Avatar
...like a shield of steel
 
Join Date: Sep 2009
Location: Somewhere in the Netherlands
Posts: 14,461
Tools and stuff that you'll need (in no particular order)

30mm deep 12 point socket for undoing / doing up the output shaft nut with newer 12 point nut

Glossy magazine covers (to fit clutch seals)

Bits of stiff but thin plastic – yoghurt pots are ideal

Vernier calliper

Depth vernier calliper

A large woodworking clamp wide enough to bridge the width of the transmission and a bit more

Heavy duty engine degreaser

Brake cleaner for cleaning – lots of it.

Fresh ATF

Lots of bags to keep parts clean

A large 3mm thick dzus screw driver or a bit of modified flat bar to remove the secondary pump

A small seal tool to fit seals

A larger seal removal tool

Circlip pliers

Some wood to make up a jig to take the K1 return piston to bits and put it back together again

A source of compressed air so that you can actuate the brake band pistons and thus measure brake band clearance
__________________
1992 W201 190E 1.8 171,000 km - Daily driver
1981 W123 300D ~ 100,000 miles / 160,000 km - project car stripped to the bone
1965 Land Rover Series 2a Station Wagon CIS recovery therapy!
1961 Volvo PV544 Bare metal rat rod-ish thing

I'm here to chat about cars and to help others - I'm not here "to always be right" like an internet warrior


Don't leave that there - I'll take it to bits!

Last edited by Stretch; 09-09-2011 at 06:19 AM.
Reply With Quote
  #7  
Old 09-09-2011, 05:52 AM
Stretch's Avatar
...like a shield of steel
 
Join Date: Sep 2009
Location: Somewhere in the Netherlands
Posts: 14,461
Tools that you might want to consider getting

Special tool (LINK) for undoing / doing up the output shaft nut with 2 prong nut

A Gucci(*) transmission stand

The special puller tool to remove the tail cone section (See note below)


* Please note to the best of my knowledge Gucci don't actually make transmission stands - I'm being sarcastic.
__________________
1992 W201 190E 1.8 171,000 km - Daily driver
1981 W123 300D ~ 100,000 miles / 160,000 km - project car stripped to the bone
1965 Land Rover Series 2a Station Wagon CIS recovery therapy!
1961 Volvo PV544 Bare metal rat rod-ish thing

I'm here to chat about cars and to help others - I'm not here "to always be right" like an internet warrior


Don't leave that there - I'll take it to bits!

Last edited by Stretch; 09-09-2011 at 06:20 AM.
Reply With Quote
  #8  
Old 09-09-2011, 05:52 AM
Stretch's Avatar
...like a shield of steel
 
Join Date: Sep 2009
Location: Somewhere in the Netherlands
Posts: 14,461
Comment regarding the order of disassembly

Please note the order of disassembly that I have decided to show you in this thread is slightly different from that written in the ATSG manual. I like my way – I'm sure ATSG like theirs.

I don't think it really matters which route you follow – make your own – but if you happen to have the special puller tool to remove the tail cone section use it before you remove the bell house section at the front of the transmission.
__________________
1992 W201 190E 1.8 171,000 km - Daily driver
1981 W123 300D ~ 100,000 miles / 160,000 km - project car stripped to the bone
1965 Land Rover Series 2a Station Wagon CIS recovery therapy!
1961 Volvo PV544 Bare metal rat rod-ish thing

I'm here to chat about cars and to help others - I'm not here "to always be right" like an internet warrior


Don't leave that there - I'll take it to bits!
Reply With Quote
  #9  
Old 09-09-2011, 05:53 AM
Stretch's Avatar
...like a shield of steel
 
Join Date: Sep 2009
Location: Somewhere in the Netherlands
Posts: 14,461
Taking it to bits (1)

Now that the torque converter is removed you can tip the transmission onto the bell housing part of the transmission casing so that you can undo the nut on the output shaft. Make sure you do this on a flat surface so you don't have the transmission resting on the input shaft. If you have a previously unmolested transmission you'll see a two pronged nut which officially needs a special tool for its removal. There is a more modern alternative for the output shaft nut which needs a deep 30mm 12 point socket. Both of these nuts are staked in place.

My transmission had the original two pronged nut. I couldn't be bothered buying yet another 2 pronged special tool socket (I'd already bought a bigger sized one for the rear wheel bearings) so I drilled it and with a punch I hammered in an anti-clockwise direction – with as much care as possible – until it came off.


Please note in the picture above I held the three legged output shaft yoke in place with wood and clamps rather than “just selecting park”! Don't select park for this method of removal you could knacker it.

Clean away any swarf or muck before you continue. A good blast of brake cleaner is one of the more expensive but effective ways...

Flip the transmission back onto its oil pan and remove the front bell housing part of the casing.


Save – jealously guard – the shims that you'll find between the bearing and the main gear set.


You can now continue to remove the primary or “front” pump. To do this loosen the mounting bolts and carefully tap the heads with a rubber hammer so that you push the front pump out of the other side of the casting.


Put the front pump carefully to one side for the moment. (Move forward to post # 31 to see pictures of the front pump 722.118 Automatic transmission rebuild (Monster DIY))

It is now worthwhile removing the little bits from the outside of the rear two parts of the casing. So remove the speedometer cable connection, the gear shift selector, the kick down solenoid, and the pressure test caps.
Attached Thumbnails
722.118 Automatic transmission rebuild (Monster DIY)-722_118-output-nut-removal-no-special-tool.jpg   722.118 Automatic transmission rebuild (Monster DIY)-722_118-bell-house-removal.jpg   722.118 Automatic transmission rebuild (Monster DIY)-722_118-bell-house-removal-guard-shims.jpg   722.118 Automatic transmission rebuild (Monster DIY)-722_118-removing-front-pump-rubber-mallet.jpg  
__________________
1992 W201 190E 1.8 171,000 km - Daily driver
1981 W123 300D ~ 100,000 miles / 160,000 km - project car stripped to the bone
1965 Land Rover Series 2a Station Wagon CIS recovery therapy!
1961 Volvo PV544 Bare metal rat rod-ish thing

I'm here to chat about cars and to help others - I'm not here "to always be right" like an internet warrior


Don't leave that there - I'll take it to bits!

Last edited by Stretch; 09-09-2011 at 06:12 PM.
Reply With Quote
  #10  
Old 09-09-2011, 05:53 AM
Stretch's Avatar
...like a shield of steel
 
Join Date: Sep 2009
Location: Somewhere in the Netherlands
Posts: 14,461
Taking it to bits (2)

Time to tackle the brake band pistons: These can be a bit tricky. On my transmission they are held in place with rings that fit into grooves. This is a simple and perfectly functional design, but unfortunately it causes some frustration when the seals or piston ring of the B2 piston in particular gets stuck in them.


The trick to deal with this is not to fight the inevitable. Let the rings or seals get stuck! You can then carefully remove them from the grooves in the housing by gently prising them with slithers of yoghurt pots: Just cut lengths of yoghurt pots or other stiff plastic packaging and carefully file the edges before you use them to prise the seals or rings from these grooves.


To remove the securing circlip ring from the caps that cover the three brake band pistons push them into the gear box and carefully pick the locking ring from the groove. For the stiffer piston covers you'll probably need to use a woodworking clamp to help you.


Once all these external attachments are removed you can flip the transmission on to its back and remove the oil pan, filter and valve body.


By the time I had removed my second valve body I found it easiest to disconnect the input valve on the valve body from the gear selector mechanism by turning the gear selector lever to the park position (towards the front of the gearbox – where the torque converter was) and a bit further so that you can unclip the connection.


When you have removed the valve body wrap it very carefully in a clean plastic bag. Keep this bit clean – really clean – especially if you don't plan to take it to bits.
Attached Thumbnails
722.118 Automatic transmission rebuild (Monster DIY)-722_118-plastic-shims-helping-fit-remove-brake-band-pistons.jpg   722.118 Automatic transmission rebuild (Monster DIY)-722_118-brake-piston-removal-using-woodworking-clamp.jpg   722.118 Automatic transmission rebuild (Monster DIY)-722_118-valve-body-removal.jpg   722.118 Automatic transmission rebuild (Monster DIY)-722_118-gear-selector-lever-connection-valve-body.jpg   722.118 Automatic transmission rebuild (Monster DIY)-722_118-brake-band-piston-cover-circlip.jpg  

__________________
1992 W201 190E 1.8 171,000 km - Daily driver
1981 W123 300D ~ 100,000 miles / 160,000 km - project car stripped to the bone
1965 Land Rover Series 2a Station Wagon CIS recovery therapy!
1961 Volvo PV544 Bare metal rat rod-ish thing

I'm here to chat about cars and to help others - I'm not here "to always be right" like an internet warrior


Don't leave that there - I'll take it to bits!

Last edited by Stretch; 09-09-2011 at 11:45 AM.
Reply With Quote
  #11  
Old 09-09-2011, 05:54 AM
Stretch's Avatar
...like a shield of steel
 
Join Date: Sep 2009
Location: Somewhere in the Netherlands
Posts: 14,461
Taking it to bits (3)

Moving to the front of the centre casing – remove the actuation assembly for the B3 brake band by pulling out a little clip.


This actuation assembly runs from the lug on the brake band to the B3 piston housing. Removal of the actuation assembly is achieved by knocking the pin “up” and out of the casing.


You can now wiggle the solid rod on the other side of the B3 brake band out of the way. These little solid torpedo bullet-like rods are also positioned on the non actuated sides (the stays) of the B2 and B1 brake bands. Take these out too.


You can now slide the gear set out of the casing on its prosthetic limb coloured plastic holder.


You can see from the picture above I didn't get it quite right. In some ways it was lucky that the brake bands were already knackered! Don't forget to remove those pins on the brake band stays.

This is what the inside of the casing will look like – there is still a bit left in there...


Attached Thumbnails
722.118 Automatic transmission rebuild (Monster DIY)-722_118-b3-brake-band-actuating-mechanism-clip.jpg   722.118 Automatic transmission rebuild (Monster DIY)-722_118-b3-brake-band-actuating-mechanism1.jpg   722.118 Automatic transmission rebuild (Monster DIY)-722_118-removing-gearset.jpg   722.118 Automatic transmission rebuild (Monster DIY)-722_118-rear-planet-gets-left-behind.jpg   722.118 Automatic transmission rebuild (Monster DIY)-722_118-torpedo-bullet_like.jpg  

__________________
1992 W201 190E 1.8 171,000 km - Daily driver
1981 W123 300D ~ 100,000 miles / 160,000 km - project car stripped to the bone
1965 Land Rover Series 2a Station Wagon CIS recovery therapy!
1961 Volvo PV544 Bare metal rat rod-ish thing

I'm here to chat about cars and to help others - I'm not here "to always be right" like an internet warrior


Don't leave that there - I'll take it to bits!

Last edited by Stretch; 09-09-2011 at 06:26 PM.
Reply With Quote
  #12  
Old 09-09-2011, 05:54 AM
Stretch's Avatar
...like a shield of steel
 
Join Date: Sep 2009
Location: Somewhere in the Netherlands
Posts: 14,461
Taking it to bits (4)

Warning:- There are two delicate bearing races on the end of the intermediate shaft which are visible at the rear end of the gear set. Remove these bearings from the end and keep them safe.


Although I didn't do it this way round; with hindsight it is probably safest to remove the cap for the secondary pump at this time. The cap of the pump casting has an awkward dzus head fastener. I had a bit of trouble with mine (722.1 Secondary pump special tool) but found that by scratching away the corrosion it was possible to to use a rounded off bit of bar to help undo it.

Here's a picture of the cap that covers the secondary pump.


And here's the pump.


Please note you'll only be able to remove the cap section and the return pressure spring of the secondary pump casting at this time. The remaining part of the secondary pump can only be removed by unscrewing a locating bolt that is accessed from within the tail cone section.


It is now quite safe to remove the bolts that hold on the “tail cone” section casing and pull it away from the centre casing.

Please note – the ATSG manual recommends the use of a special puller that stretches over the tail cone section and grips in some way or other at the joint between the tail cone section and the main casing. I couldn't see from the photograph in the manual how this works. If you happen to have this special tool you need to use it when the gear set and the front bell housing are still in position as the puller acts against the output shaft. If you try and use this puller in the order of disassembly here you will just push the output shaft into the main casing.

I found that the tail cone section came loose with some careful taps from a rubber mallet.

Once the tail cone section is removed you'll find the governor...


...and the cam follower for the secondary pump and the speedometer drive (as far as I know all 722.118 transmissions have the mechanical drive).


Attached Thumbnails
722.118 Automatic transmission rebuild (Monster DIY)-722_118-delicate-bearing-races-rear-end-intermediate-shaft.jpg   722.118 Automatic transmission rebuild (Monster DIY)-722_118-locating-bolt-secondary-pump.jpg   722.118 Automatic transmission rebuild (Monster DIY)-722_118-governor-position.jpg   722.118 Automatic transmission rebuild (Monster DIY)-722_118-tail-cone-bits.jpg   722.118 Automatic transmission rebuild (Monster DIY)-722_118-secondary-pump-cap-removal.jpg  

__________________
1992 W201 190E 1.8 171,000 km - Daily driver
1981 W123 300D ~ 100,000 miles / 160,000 km - project car stripped to the bone
1965 Land Rover Series 2a Station Wagon CIS recovery therapy!
1961 Volvo PV544 Bare metal rat rod-ish thing

I'm here to chat about cars and to help others - I'm not here "to always be right" like an internet warrior


Don't leave that there - I'll take it to bits!

Last edited by Stretch; 09-09-2011 at 04:11 PM.
Reply With Quote
  #13  
Old 09-09-2011, 05:55 AM
Stretch's Avatar
...like a shield of steel
 
Join Date: Sep 2009
Location: Somewhere in the Netherlands
Posts: 14,461
Taking it to bits (5)

Use a seal removal tool to remove the output shaft seal. To remove the rearwards bearing race you can simply remove the circlip and tap the bearing out of the tail cone section.


With the tail cone section removed you can see the parking pawl mechanism and the pressure regulating valve on the back of the centre casing.


Pull the park mechanism off of the shaft along with the spring. Unscrew the spring that works against the gear shift mechanism.


You can now remove the gear shift selector input shaft by unscrewing the little screw and then withdrawing the input shaft from the casing.


Knock out the old input shaft seal with a punch or screw driver whilst making sure you don't damage the casing.

Take some time with this next bit. Take a good look at the condition of the outside of the bearing that holds the output shaft in place in the main casing. This is a slide fit bearing – by this I mean it is a transition fit, bordering on the edge of clearance. If the outer edge of this bearing shows any signs of spinning you could be in trouble. This isn't mentioned in the ATSG manual, probably because it isn't very likely (in fact I guess it is highly unlikely), but I think it is important to be aware of it just in case. If this fit is worn, you really need to be careful when you come to fit the gear set. You'll see what I mean when I go through setting the gear set clearance; which is set from the rear end of the gearbox.

[I have searched and searched for a picture of this bearing in position and I can't find it in any of my backed up data - I could have sworn I took a picture of it... sorry folks. If I ever come across it I'll ask for it to be included.]

Gently tap out the output shaft. Tap it straight – not at an angle – so you don't damage the transition fit between the outer surface of the bearing race and the casing.
Attached Thumbnails
722.118 Automatic transmission rebuild (Monster DIY)-722_118-rear-seal-removal.jpg   722.118 Automatic transmission rebuild (Monster DIY)-722_118-fitting-input-selector-shaft.jpg   722.118 Automatic transmission rebuild (Monster DIY)-722_118-inside-tail-cone-centre-casing.jpg  
__________________
1992 W201 190E 1.8 171,000 km - Daily driver
1981 W123 300D ~ 100,000 miles / 160,000 km - project car stripped to the bone
1965 Land Rover Series 2a Station Wagon CIS recovery therapy!
1961 Volvo PV544 Bare metal rat rod-ish thing

I'm here to chat about cars and to help others - I'm not here "to always be right" like an internet warrior


Don't leave that there - I'll take it to bits!

Last edited by Stretch; 09-12-2011 at 04:17 PM.
Reply With Quote
  #14  
Old 09-09-2011, 05:55 AM
Stretch's Avatar
...like a shield of steel
 
Join Date: Sep 2009
Location: Somewhere in the Netherlands
Posts: 14,461
Taking it to bits (6)

Remove the final bits on the back of the main casing and clean off the old gasket. Do not use things like Stanley knife blades or head gasket scrapers on these aluminium castings. They are super soft compared with steel. Use some sort of chemical gasket remover or if you really have to scrape use a plastic scraping tool. If you knacker these mating surfaces you will most likely be pulling the 'box to bits again and slapping on sealant... you could then have a trouble adjusting the gear set clearance.


You might want to clean up the outside of the casings whilst all of the bits have been removed. I had a good go with semi-decent wheel cleaner. This seemed to be the best stuff I could get here but may be there are some better products where you live.

Whether you want a clean outside or not you really need to make sure the inside is perfectly clean. I used lots of brake cleaner which is probably one of the most expensive ways of doing it but hey it works (and it was on special offer).
Attached Thumbnails
722.118 Automatic transmission rebuild (Monster DIY)-722_118-cleaning-up-mating-surfaces.jpg  
__________________
1992 W201 190E 1.8 171,000 km - Daily driver
1981 W123 300D ~ 100,000 miles / 160,000 km - project car stripped to the bone
1965 Land Rover Series 2a Station Wagon CIS recovery therapy!
1961 Volvo PV544 Bare metal rat rod-ish thing

I'm here to chat about cars and to help others - I'm not here "to always be right" like an internet warrior


Don't leave that there - I'll take it to bits!

Last edited by Stretch; 09-10-2011 at 04:48 AM.
Reply With Quote
  #15  
Old 09-09-2011, 05:56 AM
Stretch's Avatar
...like a shield of steel
 
Join Date: Sep 2009
Location: Somewhere in the Netherlands
Posts: 14,461
Inspecting the brake bands

Take a break from taking bits to pieces and have a look at the condition of the brake bands. You can lift them out from between the gear set and the plastic holder. If any part of them are cracked, pitted, or damaged you need to replace them. If they are worn thin you also need to replace them. Here are some pictures of some knackered brake bands.


If anyone has experience of relining brake bands please contribute to this thread Brake band relining - a question for the adventurous. I'm interested in learning how to do this. I was told that the brake bands in this transmission are paper lined and that it is in principle possible to cure the glue in a domestic oven... sounds like fun! You might think this is a bit mad until you find out that most parts suppliers want you to pay in excess of one hundred and fifty Euros per brake band (cost more or less correct at the date of this post).

If you replace your brake bands with new ones soak them in clean ATF for at least an hour before you fit them. If you are reusing old brake bands clean them as best as you can and then soak in clean ATF. You want to keep the inside of your rebuilt transmission as clean as possible. Think surgically clean rather than “oh bugger it that'll have to be good enough”.

__________________
1992 W201 190E 1.8 171,000 km - Daily driver
1981 W123 300D ~ 100,000 miles / 160,000 km - project car stripped to the bone
1965 Land Rover Series 2a Station Wagon CIS recovery therapy!
1961 Volvo PV544 Bare metal rat rod-ish thing

I'm here to chat about cars and to help others - I'm not here "to always be right" like an internet warrior


Don't leave that there - I'll take it to bits!

Last edited by Stretch; 09-09-2011 at 01:41 PM.
Reply With Quote
Reply

Bookmarks


Posting Rules
You may not post new threads
You may not post replies
You may not post attachments
You may not edit your posts

BB code is On
Smilies are On
[IMG] code is On
HTML code is On
Trackbacks are On
Pingbacks are On
Refbacks are On


All times are GMT -4. The time now is 11:38 AM.


Powered by vBulletin® Version 3.8.7
Copyright ©2000 - 2024, vBulletin Solutions, Inc.
Search Engine Friendly URLs by vBSEO 3.6.0
Copyright 2024 Pelican Parts, LLC - Posts may be archived for display on the Peach Parts or Pelican Parts Website -    DMCA Registered Agent Contact Page