

|
|
|
|
|
|
|||||||
 |
|
|
LinkBack | Thread Tools | Display Modes |
|
#1
 07-17-2010, 09:40 PM
|
|||
|
|||
|
How To: Upper Ball Joint Replacement, step by step with pictures. W123
My upper ball joints are terrible. They need replacing. Here's how I did the passenger side. It took about an hour.
 Remove the air filter housing under the hood.  This gives us access to the bolt holding the ball joint arm to the frame of the car. Don't loosen it yet, just remember where it is.   Now we jack up the car using a hydraulic jack. I placed the jack directly under the jack-up ports behind the wheel. There is a piece of wood between the jack and car. I've placed wheel chocks behind both rear wheels. Now, remove the tire.  Here's where the top of the steering knuckle connects to the upper ball joint. Mine is crusty, with bad rubber on the bushings and on the ball joint itself. Grab your breaker bar or socket and loosen the bolt connecting the ball joint to the steering knuckle arm.  Now we have the car jacked up, but the weight of the suspension system is pulling downward. This will help us in a moment. After you've removed the bolt you want to use a cool tool.  This is a "joint popper". It's an invaluable tool for suspension work. I purchased this one from Harbor Freight for 15 bucks or so.  Place our cool tool on the joint like so. This is where the weight of the steering knuckle pulling downward helps us. Turn the tool until the joint pops apart. It came apart very easily for me.  Pop. The joint separates and is no longer connected to the upper knuckle arm.  Now remove this bolt. There is a rubber bushing under it. Pull that off too.  Now we move to the top of the car. The bolt runs horizontally through this part of the car. The nut is facing us. The bolt itself is facing the battery. It's a little tough, but you should be able to get a crescent wrench or open ended wrench on it, then place a breaker bar on the nut itself.  Break the nut loose and remove it from the bolt. Here's where it gets a little tough, because the high-side of the air conditioning runs between the battery and where we need to pull the bolt out. I tapped the bolt from the other side with a screwdriver, pushing it out toward the battery, and tried to hold the high-side R134 line out of the way. I managed to get it out, but here's where we change a little something.  Because the bolt and nut faces this way, it's difficult to get out. But....  When we put it back in we are going to put it this way, technically its backwards, but its going to be WAY easier to put back in this way, and WAY easier to take back out if we ever have to work on this ball joint again. It's a win-win situation. Don't worry, it won't affect performance or safety.  Pull the old ball joint out.  Also remove this rubber grommet and replace it with a new one.  Get your new ball joint and push it into place. Move to the top of the car. Put the bolt back through the frame like this and tighten it up.  Tighten this bolt with our new rubber grommets.  Notice that the distance between the bolt and the knuckle arm is like an inch or so. What wee need to do is "lift" the knuckle arm. Here's an easy way to do it.  Slide a safety jack under the axle. Make it as close to the brake rotor as you safely can. Extend the top of the safety jack until it is touch the suspension arm.  This is what we are looking at. The red hydraulic jack on the left will (slowly and carefully!) lower the body of the car, while the safety jack holds the knuckle in place. As the car lowers, so does the bolt on the upper ball joint, with the safety jack holding the knuckle in place, the two will meet.  Line the hole up with the bolt. When they are aligned, slowly, slowly, slowly lower the hydraulic jack, causing the ball joint bolt to go through the hole.  Success. Place the nut on the bolt and tighten it. Double check that all your nuts and bolts are tightened. The new parts I purchased came with the nylon-lined bolts that stay tight. No need to use loctite or anything. When you are done, jack the car back up using the hydraulic jack, remove the safety jack, and put the tire back on. Lower the vehicle. Then put the air filter housing back on, go in the house, and grab a beer. You rule. Disclaimer: I am not a licensed mechanic. I am a DIY guy. Follow all safety guidelines and wear eye protection. Use the proper equipment and tools, and be careful. Failure to follow safety precautions can lead to injury, or even death. Always use safety jacks when raising the car up on hydraulic jacks. The brake pads of your car may contain dust particles that are hazardous to your health. When in doubt, wear breathing protection, such as a respirator. The use of nitrile gloves is highly recommended, as some fluids, such as motor oil, can be damaging to the skin.
__________________
1984 300D Last edited by littlerobot; 07-17-2010 at 10:27 PM. Reason: continuation 
|
|
#2
07-17-2010, 10:39 PM
|
||||
|
||||
|
Very nice job but something is very wrong with your brakes. Do you have the correct pads?
__________________
1985 300TD Turbo Euro-wagon 1979 280CE 225,200 miles 1985 300D Turbo 264,000 miles 1976 240D 190,000 miles 1979 300TD 220,000 GONE but not forgotten 1976 300D 195,300 miles 1983 300D Turbo 175,000 miles http://i42.photobucket.com/albums/e3...e485-1-2-1.jpg
|
|
#3
07-17-2010, 10:48 PM
|
|||
|
|||
|
I believe I do have the correct pads. The rust you see on the rotors is due to the fact I pulled them off a car at the parts yard. They are still within safe specs, as far as rotor thickness. Is there something you see I do not? You've got me worried...

__________________
1984 300D Last edited by littlerobot; 07-17-2010 at 10:51 PM. Reason: spelling
|
|
#4
07-17-2010, 10:50 PM
|
||||
|
||||
|
I dont understand why you have such a large area of un-used friction space on the rotor.
__________________
1985 300TD Turbo Euro-wagon 1979 280CE 225,200 miles 1985 300D Turbo 264,000 miles 1976 240D 190,000 miles 1979 300TD 220,000 GONE but not forgotten 1976 300D 195,300 miles 1983 300D Turbo 175,000 miles http://i42.photobucket.com/albums/e3...e485-1-2-1.jpg
|
|
#5
07-17-2010, 10:55 PM
|
|||
|
|||
|
The brake pads are only 3 or 3.5 inches wide. Seems standard for an 84 300d. The just replaced the pads and the prior pads were exactly the same width. I'm 99 percent certain they are within spec.
By the way, that is a beautiful red merc in your signature pic!
__________________
1984 300D
|
|
#6
07-17-2010, 10:58 PM
|
|||
|
|||
|
Also, have you painted the aluminum rims on your car? If so (or not) will you tell me how you got them to sparkle? I want mine to look like yours.
__________________
1984 300D
|
|
#7
07-17-2010, 11:00 PM
|
||||
|
||||
|
Thank you so much
Here is what it should look like, notice that all the friction space on the rotor is used 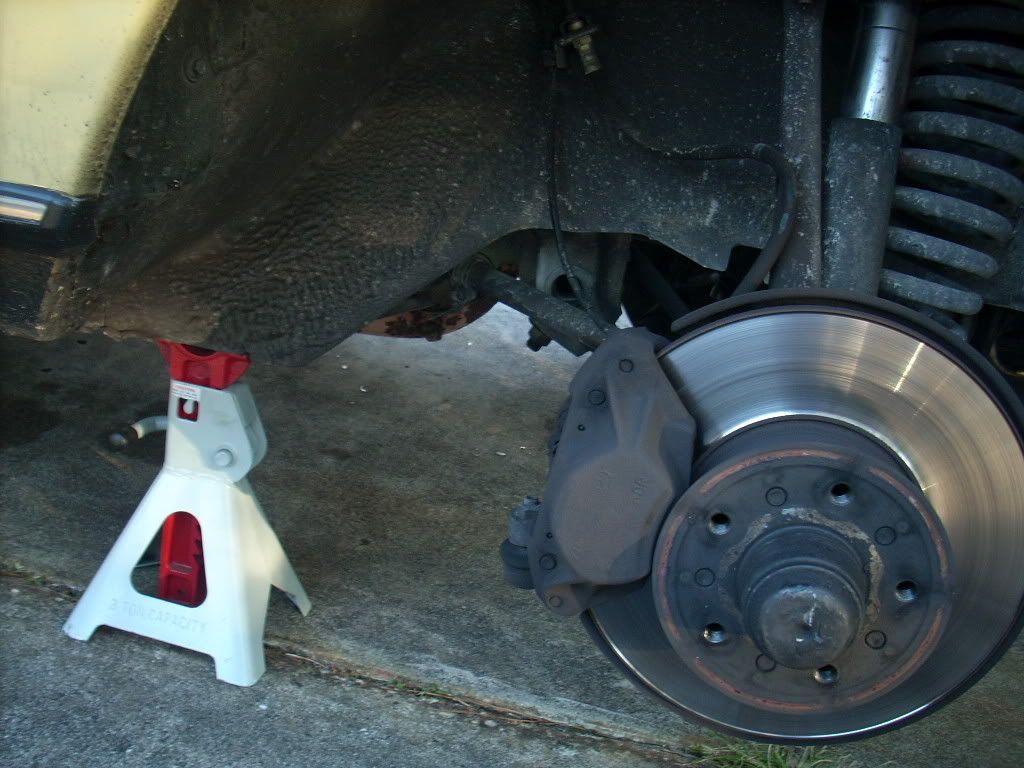
__________________
1985 300TD Turbo Euro-wagon 1979 280CE 225,200 miles 1985 300D Turbo 264,000 miles 1976 240D 190,000 miles 1979 300TD 220,000 GONE but not forgotten 1976 300D 195,300 miles 1983 300D Turbo 175,000 miles http://i42.photobucket.com/albums/e3...e485-1-2-1.jpg
|
|
#8
07-17-2010, 11:08 PM
|
|||
|
|||
|
I will check my pads tomorrow. There may be differences in calipers, though, yours seem to hug the hub, and mine are backed off a little. But I will definitely double check the placement and installation of my calipers and pads tomorrow. I'll be under there installing a new idler arm anyway.

__________________
1984 300D
|
|
#9
07-17-2010, 11:11 PM
|
||||
|
||||
|
you know what it looks like, rear calipers on the the front. Does the caliper have brake pad wear sensors mounted to it?
Take a look this very interesting.
__________________
1985 300TD Turbo Euro-wagon 1979 280CE 225,200 miles 1985 300D Turbo 264,000 miles 1976 240D 190,000 miles 1979 300TD 220,000 GONE but not forgotten 1976 300D 195,300 miles 1983 300D Turbo 175,000 miles http://i42.photobucket.com/albums/e3...e485-1-2-1.jpg
|
|
#10
07-17-2010, 11:30 PM
|
|||
|
|||
|
Definitely the front calipers have sensors and front brake pads mounted. Rear brake pads will not fit into front calipers using the locking pins and anti rattle springs. I'm sure it can be done, but it would be very hard to put rear pads into front calipers. You would definitely know something was incorrect, and I don't think the pads would remain seated very long. They would probably fall out very quickly. Are you sure the "wear pattern" on your rotors is actually a wear pattern? If you buy the rotors new, the entire surface will sparkle. The rotors on my car have been subjected to the elements in the yard, and the previous rotors had the exact wear pattern.
__________________
1984 300D
|
|
#11
07-17-2010, 11:42 PM
|
||||
|
||||
|
I know rear pads wont fit into front calipers, i was wondering if some how those where rear calipers on the front, which isn't the case since you said they have wear sensors mounted to the caliper.
Take some pid of the caliper and where the pads meet the rotor. Your rotors shouldn't look like that, they should look like mine, im wondering if the pistons in your calipers are pushing at a angle. Are both sides of the rotor the same? is the drivers side the same way?
__________________
1985 300TD Turbo Euro-wagon 1979 280CE 225,200 miles 1985 300D Turbo 264,000 miles 1976 240D 190,000 miles 1979 300TD 220,000 GONE but not forgotten 1976 300D 195,300 miles 1983 300D Turbo 175,000 miles http://i42.photobucket.com/albums/e3...e485-1-2-1.jpg
|
|
#12
07-17-2010, 11:48 PM
|
||||
|
||||
|
There is not enough contact between your pads and the rotor. Look at the pic of the other rotor that was posted. You can see how much contact area there is compared to yours. Almost half of your rotor is not in contact with your brake pads. If it was the rust would have come off in one day of driving. Or one hour here in L.A.
 . .Also I never jack the car up where you did, wood or not. The metal around the jack points is not any thicker than other parts of the car and can collapse the rocker panels. I always jack the car from the sub frame just a couple inches inboard of where you have your jack. The same place that white jack stand is placed in the other picture. Solid steel. Thanks for the post & pics. 
__________________
'70 F100 shortbed '82 Diesel Westy '83 Euro 300TD Curtlo Viper Yeti ARC Surly long haul trucker
|
|
#13
07-18-2010, 12:01 AM
|
||||
|
||||
|
I've never seen a caliper like yours OP,
can you post a pic of the caliper side of your rotor? your piston is very small. also post pics of your brake pads. ours are almost square. yours look like they are thin and long...
__________________
John HAUL AWAY, OR CRUSHED CARS!!! HELP ME keep the cars out of the crusher! A/C Thread "as I ride with my a/c on... I have fond memories of sweaty oily saturdays and spewing R12 into the air. THANKS for all you do! My drivers: 1987 190D 2.5Turbo 1987 560SL convertible 1987 190D 2.5-5SPEED!!!  1987 300TD 2005 Dodge Sprinter 2500 158"WB 1994GMC 2500 6.5Turbo truck... I had to put the ladder somewhere!
|
|
#14
07-18-2010, 12:02 AM
|
|||
|
|||
|
Tomorrow I'll pop off both front wheels and do a detailed inspection of the rotors and calipers. If there is a mistake, I'll post it, with pics. If correct, this could be an important safety issue.
As far as the position of the hydraulic jack in the pics, this placement and method has been used in countless posts on suspensions, which is where I got the idea. We all know using the roll-up jack points with the original MB jack is unsafe and outdated. If the solid steel jackpoints underneath is truly the best and safest methods, I'll adopt it and pass the info along. The method used in my post may not be the safest, but is still far safer than the original MB endorsed method (using the crank-jack) that came with the vehicles from the factory. The point of this forum is to pass along information regarding DIY information, making easier and safer for folks like me to work on our cars. I appreciate the information both of you have passed along, and will take it into account in my next post. Thank you .That said, brake issues aside, I am confident that my method of upper ball joint replacement is solid. Users following it should take into account the proper placement of the hydraulic jack and follow all safety precautions.
__________________
1984 300D
|
|
#15
07-18-2010, 12:06 AM
|
||||
|
||||
|
Yes i concur. The upper control arm replacement was done correctly, i will recommend this guide to the next guy.
However, we need to find out what is wrong with your brakes, im sure your Mercedes is not stopping like a Mercedes should.
__________________
1985 300TD Turbo Euro-wagon 1979 280CE 225,200 miles 1985 300D Turbo 264,000 miles 1976 240D 190,000 miles 1979 300TD 220,000 GONE but not forgotten 1976 300D 195,300 miles 1983 300D Turbo 175,000 miles http://i42.photobucket.com/albums/e3...e485-1-2-1.jpg
|
|
| Bookmarks |
|
|


 Linear Mode


