

|
|
|
|
|
|
|||||||
 |
|
|
LinkBack | Thread Tools | Display Modes |
|
|
|
#1
 05-20-2013, 05:33 PM
|
||||
|
||||
|
Everyone rebuilding their A/C system should clean out their HVAC assembly box!
When I went through my A/C about 5-6 years ago, I knew I should of did this to my then 25 year old car. Now I'm disgusted to know that I, as well as my family and friends, have been breathing in this crap all these years.
Outside air intake shot immediately after I pulled the whole HVAC unit.  Upper outside air plenum. Filthy interior shot with the cover removed.  Evaporator - Filled with so much crap that part of the evap is in poor material condition from corrosion.  Heater core also took in a lot of dirt.   I now need to figure out how to implement a cabin filter to keep this box clean. .
__________________
1983 123.133 California - GreaseCar Veg System 
Last edited by DeliveryValve; 05-20-2013 at 06:48 PM. 
|
|
#2
05-20-2013, 05:51 PM
|
|||
|
|||
|
Man, that is some nasty stuff there. It appears old car = lots of gunk in the air system. When I see things like this it makes me wonder how the air handling systems on commercial passenger aircraft look like......we can only imagine.....
|
|
#3
05-20-2013, 06:13 PM
|
|||
|
|||
|
Bummer no change or straws
 I'll do this when my heater core fails or I find a mint condition w123 that I can afford....till then my climate control involves rolling the windows down...technically not much better...
__________________
|
|
#4
05-20-2013, 06:18 PM
|
||||
|
||||
|
Quote:
  .
__________________
1983 123.133 California - GreaseCar Veg System
|
|
#5
05-20-2013, 08:47 PM
|
||||
|
||||
|
Quote:
I could pay you a dime to do mine!!! When I did my A/C rebuild last year, I was pretty sure that everything was fairly clean. However, I did not pull apart the HVAC system. Maybe I can run vacuum hose in there if I find a good dash and do the swap. I have a piece of wood wedged in my blower compartment to keep the fresh air flap 100% closed. I did that to maximize A/C efficiency but I can see the other benefits. Keep us posted on what kind of filter setup you design.
__________________
1991 F250 super-cab 7.3 IDI. (rebuilt by me) Banks Sidewinder turbo, hydroboost brakes, new IP and injectors. 2003 S430 - 107K 1983 300SD - Tanoshii - mostly restored ~400K+. 1983 300SD - Good interior. Engine finally tamed ~250K. Monark Nozzle Install Video - http://tinyurl.com/ptd2tge
|
|
#6
05-20-2013, 10:47 PM
|
||||
|
||||
|
Almost .....
DeliveryValve ----
Your evaporator didn't look as bad as mine and you got paid more  I only found a penny down in the defrost area. I like the idea of a cabin vent. Maybe something over the bottom of the blower??? I only found a penny down in the defrost area. I like the idea of a cabin vent. Maybe something over the bottom of the blower??? Just for comparisons sake, here's what the 1984 Light Ivory evaporator looked like:    
__________________
daw_two Germantown, TN Links: Sold last car --- 05/2012 1984 300D Light Ivory, Red interior No longer selling Cluster Needles Paint No longer selling New Old Stock (NOS) parts Past: 3/2008 1986 300SDL "Coda" 04/2010 1965 190D(c) "Ben" & many more
|
|
#7
05-21-2013, 08:28 AM
|
|||
|
|||
|
I once removed a 98 camry evaporator ( for a college student freind) - that car also does not use a filter, and it was similar to these pictures, Toyota sold a product in a can that was really powerful it was expanding foam and it pushed itself through the evaporator, heater core etc literally melting the dirt. btw I had to do 4 passes back and forth to make it brand new again.
But just saying, I think the product being sold on pelican with a long straw is similar. oddball bit toyota provided a slot for a filter in that car - yet they forgot to install it in the factory.
__________________
2012 BMW X5 (Beef + Granite suspension model) 1995 E300D - The original humming machine (consumed by Flood 2017) 2000 E320 - The evolution (consumed by flood 2017)
|
|
#8
05-20-2013, 06:57 PM
|
|||
|
|||
|
Nasty! What was the reason to take it to bits this time? I'm sure mine is as dirty. I'm considering doing this solely for air conditioning performance and smell improvements.
__________________
Current fleet 2006 E320 CDI 1992 300D - 5speed manual swapped former members 1984 300D "Blues Mobile" 1978 300CD "El Toro"
|
|
#9
05-20-2013, 08:17 PM
|
||||
|
||||
|
Air flow performance was an issue every year in this 105 plus degree heat we have here. Vent temperatures were great though. I figured I'd redo everything including a Sanden compressor upgrade, use of a bigger parallel flow condenser then previously used and finally sound proof the fire wall.
.
__________________
1983 123.133 California - GreaseCar Veg System
|
|
#10
07-13-2016, 09:49 AM
|
||||
|
||||
|
Quote:
Did you have a post on the PF condenser install? You'd changed your AC system quite a bit since 2013. I'd be interested in a description of the changes made and performance differences as a result of each change.
__________________
85 300D turbo pristine w 157k when purchased 161K now 83 300 D turbo 297K runs great. SOLD! 83 240D 4 spd manual- parted out then junked
|
|
#11
07-19-2016, 02:52 AM
|
||||
|
||||
|
Quote:
12-0437C - PF Condenser (14 X 22.5) At that particular moment, sometime in 2007, AC kits didn't offer any other size that would work in a w123 when I needed one. I posted the entire AC condenser and rebuilt R4 compressor install on the old schumanautomotive forum website. That was before that site went all paranoid and made everything private few years after 2007. At the time, I thought the cooling was adequate with Freeze 12. But ultimately I swapped it out with R12 because I couldn't stand the drag the higher pressure Freeze 12 was putting on the R4 Compressor. As soon as I made the change, I remember the cooling went from low 40's/high 30's F with Freeze 12 down to low 30's with the R12. It froze me out sometimes with temps hovering at 32° out of the vents. But when the car sat awhile in the 100° plus sun, I could feel I had a circulation issue, which brought me to the main topic in this thread. This endeavor was spearheaded by the untimely death from a catastrophic internal destruction of the rebuilt R4 that was installed 5 years earlier. Quote:
2) As I mentioned earlier, I had a compressor failure which blew up internally. Not a pretty sight, basically sending shrapnel through the lines. I was forced replace the majority of the lines and replacing the condenser as well from the shrapnel contamination. I would end up buying a cheap eBay 16x22 inch condenser. Slightly bigger than the 14x22.5 AC kits condenser I had. I would also end up installing a later 2nd gen w126 electric fan to improve the air flow. 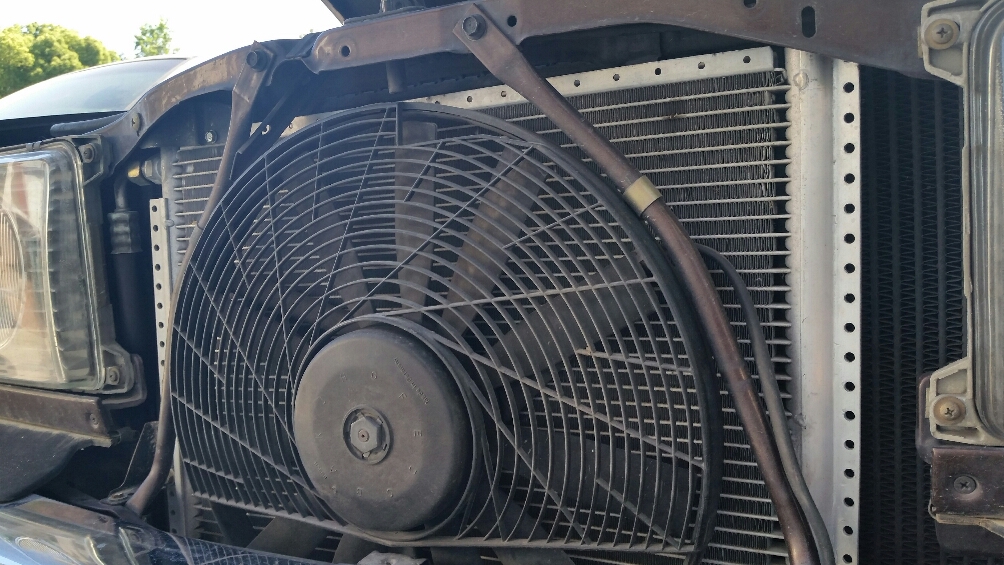 Here is the thread: 86-91 W126 aux fan into W123 300D ?? As of right now, I would say the eBay condenser and 2nd gen w126 fan has done it’s job and cooled very well. I can’t really say if performance has improved upon what I had before, because it is all one system working together. But would guess it has. 3) One of my main concerns was the evaporator getting clogged up with dirt again. So I made a modification to the firewall and installed a fresh air cabin filter. 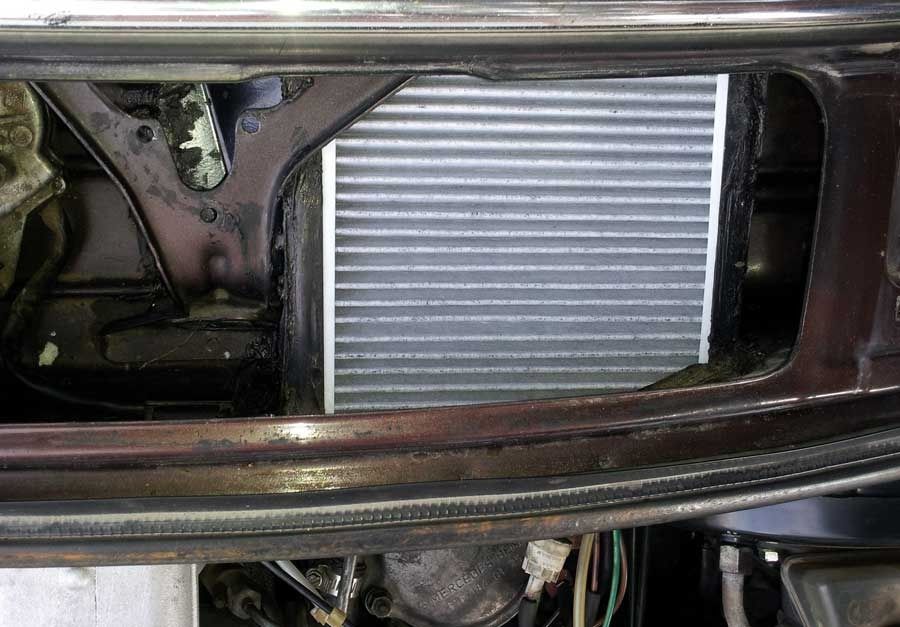  Here is the thread: w123 Outside Air Cabin Filter addition I have to say this mod has been working out really well. I am using a basic 2005-2014 Mustang cabin filter. I found the charcoal activated filter types restrict the air flow a bit. 4) The other modification I did to the system had to do with the recirculation flaps. I live in an area with some dairy farms. If you know what I am talking about, it can get stinky. Sometimes, my system would draw in fresh air when I want them closed near those farms. I made an override switch. Which also helps with cooling down the cabin quicker occasionally.  Here is the thread: w123 HVAC recirculation modification 5) Since I had a catastrophic compressor failure, I opted to go with a 7 cylinder Sanden 7h15 compressor using R12 refrigerant and Rollguys First Gen bracket kit. Here it is mocked up on my spare motor.  I do feel the Sanden is a smoother operating compressor vs the R4. But performance wise, engine drag maybe the same and I am getting the same 32° F vent temps as before. So I feel I haven’t really upgraded in that aspect. Issues… I do have issues with belt stretch and is trying to find a sweet spot on the Contitech belt size. I also was kind of stubborn and decided to try to make the hoses somewhat factory looking using the original A/C hose manifold to the connect to the compressor. As I type this, the manifold has cracked a second time at the braze repair from the first crack that it suffered previously. I have now lost my second 2.9 lbs charge of R12 to the atmosphere. I will have to determine if the crack was due to a faulty braze repair or was due to the use of a poorly modified R4 manifold. I hope I answered the question you were asking.
__________________
1983 123.133 California - GreaseCar Veg System
Last edited by DeliveryValve; 07-19-2016 at 05:09 PM.
|
|
#12
07-19-2016, 10:47 AM
|
||||
|
||||
|
Just to let you know, I have a stack of R4 manifolds. They are free for the taking, or you pay for the shipping and you can have as many as you need. If I were using the stock manifold, I would weld on a male fitting like I do for the pipe on top of the engine. That way the rubber hose portion can be disconnected if replacement is needed. Of course I would replace the hose anyway, and crimp on the proper fitting to screw on the manifold. I have everything to do so, it is just that the systems I do, I run a new hose above the engine, and not below.
__________________
 All Diesel Fleet 1985 R107 300SLD TURBODIESEL 2005 E320 CDI (daily) LOTS of parts for sale! EGR block kit http://www.peachparts.com/shopforum/diesel-discussion/355250-sale-egr-delete-block-off-plate-kit.html 1985 CA emissions 617 owners- You Need This! Sanden style A/C Compressor Mounting Kit for your 616/ 617 For Sale + Install Inst. Sanden Instalation Guide (post 11): http://www.peachparts.com/shopforum/diesel-discussion/367883-sanden-retrofit-installation-guide.html
|
|
#13
05-21-2013, 10:59 AM
|
||||
|
||||
|
Now there's some comforting pictures - thanks for posting them folks!
__________________
1992 W201 190E 1.8 171,000 km - Daily driver 1981 W123 300D ~ 100,000 miles / 160,000 km - project car stripped to the bone 1965 Land Rover Series 2a Station Wagon CIS recovery therapy! 1961 Volvo PV544 Bare metal rat rod-ish thing I'm here to chat about cars and to help others - I'm not here "to always be right" like an internet warrior  Don't leave that there - I'll take it to bits!
|
|
#14
05-21-2013, 11:02 AM
|
|||
|
|||
|
Quote:
basically, every car needs a cabin air filter. Another pic to make you feel happy stretch. Not MB, but same problem of no air filter-
__________________
This post brought to you by Carl's Jr.
|
|
#15
05-28-2013, 12:54 PM
|
||||
|
||||
|
I would say it would take that long as daw_two stated, I've been taking my good ole time on this.
Quote:
PeachPartsWiki: Replacing the A/C Evaporator .
__________________
1983 123.133 California - GreaseCar Veg System
|
|
| Bookmarks |
|
|


 Hybrid Mode


